
User manual
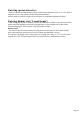
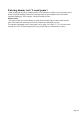
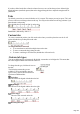
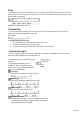

Table Of Contents
- Support
- More from MAGIX
- Welcome to MAGIX Xtreme Print Studio
- Short description
- Document handling
- Object Handling
- The Pen Tool
- Creating rectangles and squares
- Creating circles and ellipses
- Creating regular polygons (the Quickshape Tool)
- Color Handling
- Text Handling
- Printing
- Customizing
- Menus and Keyboard Shortcuts
- Introduction
- File menu
- Edit menu
- Undo (Standard control bar or Ctrl+Z)
- Redo (Standard control bar or Ctrl+Y)
- Cut (Edit control bar or Ctrl+X)
- Copy (Edit control bar or Ctrl+C)
- Paste (Edit control bar or Ctrl+V)
- Paste in place (Ctrl+Shift+V)
- Paste Attributes (Ctrl+Shift+A)
- Delete (Edit & Standard control bars or Delete)
- Select All (Ctrl+A)
- Clear Selection (Esc)
- Duplicate (Edit control bar or Ctrl+D)
- Clone (Ctrl+K)
- Arrange menu
- Utilities menu
- Window menu
- Help menu
- The help system

Tabs, Margins and Indents
Rulers
To adjust tabs, margins and indents you need to turn on rulers in your document.
To do this:
Chose "Windows -> Bars -> Rulers".
Or press "Ctrl + Shift+ R" (this is a new shortcut).
Or press "Ctrl + L" (when not in the Text Tool).
The enhanced text features will only appear on the ruler when you are using the Text Tool and when the
text cursor is in a text story or the text object is selected when in the Text
Tool.
In the Text Tool when you drag the margins or tabs on the ruler, you get a temporary vertical guide to
make it easier to align the tabs or margins to objects elsewhere on the page. In addition when dragging
tabs or margins, if you have magnetic snap switched on, these will snap to each other making it easier to
position tabs and margins.
Margins and indents
Any changes you make are made to the current paragraph of text. (i.e. the paragraph containing the text
cursor) or, if you have a selected region of text, to the paragraphs of the selected region.
You can apply changes to all text in a text story by selecting all the text within that story ("Ctrl + A"). To
change more than one text story, select the text objects while in the Selector Tool then change to the
Text
Tool and make the required changes.
Left margin
. Drag this to change the left margin of the text.
First line margin.
Drag this to change the left margin for the first line of the paragraph
(useful for lists, as shown below).
Right margin.
Drag this to change the right margin of the text.
Demonstrating the left margin and first line
margin
Demonstrating a right margin
Text along a curve
If you have fitted a single line of text to the curve using the Fit text to curve
option, then the curve line is the margin. If the text is longer than the line it will just flow off the end.
Full
justification will always fit the text onto the line, if necessary overlapping characters.
Page 145