
User manual

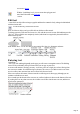
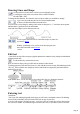
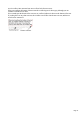

Table Of Contents
- Support
- More from MAGIX
- Welcome to MAGIX Xtreme Print Studio
- Short description
- Document handling
- Object Handling
- The Pen Tool
- Creating rectangles and squares
- Creating circles and ellipses
- Creating regular polygons (the Quickshape Tool)
- Color Handling
- Text Handling
- Printing
- Customizing
- Menus and Keyboard Shortcuts
- Introduction
- File menu
- Edit menu
- Undo (Standard control bar or Ctrl+Z)
- Redo (Standard control bar or Ctrl+Y)
- Cut (Edit control bar or Ctrl+X)
- Copy (Edit control bar or Ctrl+C)
- Paste (Edit control bar or Ctrl+V)
- Paste in place (Ctrl+Shift+V)
- Paste Attributes (Ctrl+Shift+A)
- Delete (Edit & Standard control bars or Delete)
- Select All (Ctrl+A)
- Clear Selection (Esc)
- Duplicate (Edit control bar or Ctrl+D)
- Clone (Ctrl+K)
- Arrange menu
- Utilities menu
- Window menu
- Help menu
- The help system

Drawing Lines and Shape
Use the pencil tool to draw lines. Click for a new straight line section;
if you drag the corner points, curved lines will be created. Finish the
line with "Shift + click".
To change the line thickness, first select the object or objects which you would like to change:
Type a new line width into the text box on the standard toolbar
or choose a default line thickness from the menu.
You can create a closed shape by ending a line back at its start point. A "+" beside the mouse pointer
indicates that it is positioned over the start handle.
Lines and closed shapes can be edited retroactively.
Use the square and circle tools to create these shapes as frames for
text areas or images
.
With the "Quickshape" tool, you can create other polygons and
stars. More about this in the reference
section.
Edit text
A text field is an object like an image or graphic and therefore cannot be freely enlarged or diminished
with the selection tool.
To edit text directly, switch to the text tool.
Next, click the text object, and you will be able to edit the text like normal.
To change properties of the text like font or size, click with the text tool in a text field and then press the
"Esc" key. The text field is now completely selected, which can be recognized by the small selection
marker to the top-left.
In the infobar above, you are now able to set properties like font, size, alignment, and more.
Entering text
In the Text
Tool if you click and drag diagonally on the page you will create a rectangular text area. The blinking
cursor will be positioned in the top left corner and you can type or paste text.
A text area can contain a "flowing" text story. A text story refers to a single piece of text, flowing from
one text area to another. It's called flowing text because, like water, as you add or remove text in one
Page 14