
User manual


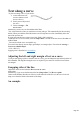
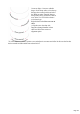
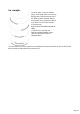

Table Of Contents
- Support
- More from MAGIX
- Welcome to MAGIX Xtreme Print Studio
- Short description
- Document handling
- Object Handling
- The Pen Tool
- Creating rectangles and squares
- Creating circles and ellipses
- Creating regular polygons (the Quickshape Tool)
- Color Handling
- Text Handling
- Printing
- Customizing
- Menus and Keyboard Shortcuts
- Introduction
- File menu
- Edit menu
- Undo (Standard control bar or Ctrl+Z)
- Redo (Standard control bar or Ctrl+Y)
- Cut (Edit control bar or Ctrl+X)
- Copy (Edit control bar or Ctrl+C)
- Paste (Edit control bar or Ctrl+V)
- Paste in place (Ctrl+Shift+V)
- Paste Attributes (Ctrl+Shift+A)
- Delete (Edit & Standard control bars or Delete)
- Select All (Ctrl+A)
- Clear Selection (Esc)
- Duplicate (Edit control bar or Ctrl+D)
- Clone (Ctrl+K)
- Arrange menu
- Utilities menu
- Window menu
- Help menu
- The help system

Create an ellipse. Convert to editable
shapes. In the shape editor, select the top
half (top three control points) and select
the "Break at points" function. Remove
the top half to leave just the lower half as
seen. In the Text Tool click at about 6
o'clock and type.
Right click and select Reverse text on
curve
to flip the text to the other side.
Drag the red margin handles in from
either end. Select the center text
alignment option.
To create offset text, create a separate curve and adjust its curvature and offset. In this case the line has
also been made invisible and the text reduced in size.
Page 134