
User manual
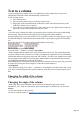
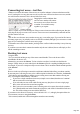
Table Of Contents
- Support
- More from MAGIX
- Welcome to MAGIX Xtreme Print Studio
- Short description
- Document handling
- Object Handling
- The Pen Tool
- Creating rectangles and squares
- Creating circles and ellipses
- Creating regular polygons (the Quickshape Tool)
- Color Handling
- Text Handling
- Printing
- Customizing
- Menus and Keyboard Shortcuts
- Introduction
- File menu
- Edit menu
- Undo (Standard control bar or Ctrl+Z)
- Redo (Standard control bar or Ctrl+Y)
- Cut (Edit control bar or Ctrl+X)
- Copy (Edit control bar or Ctrl+C)
- Paste (Edit control bar or Ctrl+V)
- Paste in place (Ctrl+Shift+V)
- Paste Attributes (Ctrl+Shift+A)
- Delete (Edit & Standard control bars or Delete)
- Select All (Ctrl+A)
- Clear Selection (Esc)
- Duplicate (Edit control bar or Ctrl+D)
- Clone (Ctrl+K)
- Arrange menu
- Utilities menu
- Window menu
- Help menu
- The help system

Connecting text areas—text flow
When text overflows the bottom of the text area, an overflow indicator is shown on the bottom of the
area. If you drag this over any other text area, the overflow text will flow into the new text area, and the
two areas become connected. This is shown with a flow arrow.
Dragging the overflow indicator from
one text area to another will connect
the two areas so text flows from one
to another. You can link as many
together as you require.
There is a quick way to create flowing text. If the text cursor in an area with overflowing text, then just
click-drag on the page to create a new text area. The new text area is automatically connected and text
will flow into the new area.
Tip
: you can flow text from one area to another on any page, even earlier pages. If you need to flow into an
area many pages away, it's probably easier to use the above method, although if you zoom out to a small
page size you can drag the overflow arrow across pages.
To disconnect one text area from another, just drag on the overflow indicator and drop it away from any
text area.
If you delete a text area that is connected to another only the area is deleted, the text will simply re-flow
into the remaining text areas.
Resizing text areas
Using the Text
Tool, you can click and drag on any of the corner control handles. The text in the area will be
reformatted to fit the new size.
Alternatively you can use the Selector Tool to resize the text object, but in this case the behavior
changes. Usually when you resize and object in the Selector it resizes everything including the text. So,
for example, if you resize a simple text object or text column. This is consistent with the normal operation
of the Selector
Tool.
However in the case of flowing text areas this would cause undesired side-effects; you almost certainly
do not want part of a flowing text story to be a different point size than the rest. Therefore, the Selector
Tool behavior varies depending on whether you are resizing one text area that contains a flowing text
story, or resizing the whole text story. The rule is:
If you resize a single unconnected text area (or simple or text column) then the area "container"
and text content are resized together.
If you select the text areas of the whole flowing text story (they have to be one a single page)
then a resize will resize the text and areas together.
But if you resize a text area that is part of a flowing series of text areas, then only the container
size is altered and the text inside remains the original size, and will be re-formatted to fit the new
size. This is like resizing a text area with the Text Tool.
If you want to resize all text in a text story, select it all with "Ctrl + A", and apply the required font size.
You can rotate a text area, using the Selector
Tool as normal, and the text will flow through the rotated text area normally.
Page 129