
User manual
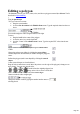
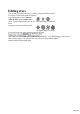
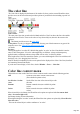
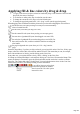

Table Of Contents
- Support
- More from MAGIX
- Welcome to MAGIX Xtreme Print Studio
- Short description
- Document handling
- Object Handling
- The Pen Tool
- Creating rectangles and squares
- Creating circles and ellipses
- Creating regular polygons (the Quickshape Tool)
- Color Handling
- Text Handling
- Printing
- Customizing
- Menus and Keyboard Shortcuts
- Introduction
- File menu
- Edit menu
- Undo (Standard control bar or Ctrl+Z)
- Redo (Standard control bar or Ctrl+Y)
- Cut (Edit control bar or Ctrl+X)
- Copy (Edit control bar or Ctrl+C)
- Paste (Edit control bar or Ctrl+V)
- Paste in place (Ctrl+Shift+V)
- Paste Attributes (Ctrl+Shift+A)
- Delete (Edit & Standard control bars or Delete)
- Select All (Ctrl+A)
- Clear Selection (Esc)
- Duplicate (Edit control bar or Ctrl+D)
- Clone (Ctrl+K)
- Arrange menu
- Utilities menu
- Window menu
- Help menu
- The help system

Editing stars
You can edit stars in the same ways as ordinary polygons (described earlier).
To increase or decrease the depth of stellation:
Drag a star handle or select stellation
radius & offset on the editable items
menu. Type the required values into the text
boxes.
The original shape is on the left.
Or drag the sides to make them curved:
The original shape is on the left.
You can also nudge the values using the buttons to the right.
"Ctrl + drag" one side of a star moves all the sides symmetrically. "Ctrl + Shift dragging" moves pairs of
sides as mirror images. "Ctrl + double click" on a side, or click the restore edges
button to make all sides straight again.
Page 104