
7.0
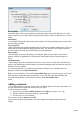
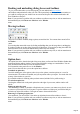
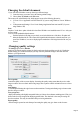
Table Of Contents
- Welcome to Xara 3D Maker 7
- Purchasing and unlocking Xara 3D Maker
- What's New in Xara 3D Maker Version 7
- Other Xara products
- Getting Help
- Working with Xara 3D Maker
- How To ...
- Quick overview
- Open a new document
- Change the text
- Rotate and position the graphic
- Light the graphic
- Color the graphic
- Resize the graphic
- Add bevels & extrude
- Select characters
- Add shadows
- Create animations
- Creating cursor (CUR & ANI) files
- Importing 2D objects
- Apply the style of an existing graphic
- Create buttons, boards, boards + holes and borders
- Create screen savers
- Create Flash files
- Save and export
- Export options for GIF, PNG or BMP files
- Export options for JPG
- Export options for animated cursors (ANI)
- Export options for animated GIFs
- Export options for AVIs (movies and screen savers)
- Export options for screen savers (SCR)
- Export options for Flash bitmap format (SWF) files
- Export options for Flash vector format (SWF) files
- General info on AVI videos
- Exporting transparent title animations for movies
- Customize Xara 3D Maker
- Reference Section
- Legal

Option bars
The option bars can be found to the right of the screen when you first start Xara 3D Maker. Rather than
opening and closing endless windows, most of Xara 3D Maker's settings are contained here. You can
easily switch between the tabs to access the different features.
You can turn this entire panel off or on via the Window
menu. You can also tailor how you use the option bars as follows:
To undock an option bar.
Just click and drag one of the options (where it says color options, extrusion options etc.) out of its
current location. The window will undock, and you can position where you require. You can do this with
as many of the windows as you wish.
If you find the window is redocking when you don't want to, hold the Ctrl key while moving it.
To redock an option bar.
Just drag the window back to the panel options bar at the right of your screen, and the window will
redock.
Pinning an option bar open.
After undocking a window, by default it will minimize once you move your mouse away from it. As soon
as you move your mouse back, it will expand. To get the window to remain open, just click the little pin
icon at the top right of the window. Click again to return to the auto-hide format.
Removing or reopening an option bar.
Once undocked, you can click the X icon in the top right hand corner of that window to close it.
Note: If you experience a problem with your windows or toolbars at any time, or wish to return them to
their standard layout, click Reset user interface on the Window
menu.
Advanced customization
's customization options are recommended only for advanced users. They can be accessed by clicking
Customize from the Window menu, or by right clicking on a toolbar and selecting Customize
.
Note: If you experience a problem with your windows or toolbars at any time, or wish to return them to
their standard layout, click Reset user interface on the Window
menu.
Customize options are broken down into five areas:
Commands
Here you can add icons to a menu or the standard toolbar, and even create you own custom menu.
Click a category to see related commands to its right. You can drag any of the commands to the
standard toolbar where they will be added to allow easy access to that tool or feature in the future. To
remove a button, just right click it and select delete.
Commands can also be dragged to any of the menus. Or you can create your own menu. Click the New
Menu option then drag the New Menu command to the menu bar at the top of your screen. To give the
menu a custom name just right click it and select Button Appearance
. You can then drag icons to it as you would with a standard toolbar (described above).
If you right click an icon or menu option, and select Start Group
, a divider will appear between it and the previous icon or option (grayed out for the first option in the
list).
Right clicking an icon and selecting Image and Text
will show a text label with the icon?useful if you forget what an icon does. To show all text labels, see the
Toolbars option below.
Page 99