
7.0
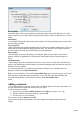
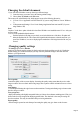
Table Of Contents
- Welcome to Xara 3D Maker 7
- Purchasing and unlocking Xara 3D Maker
- What's New in Xara 3D Maker Version 7
- Other Xara products
- Getting Help
- Working with Xara 3D Maker
- How To ...
- Quick overview
- Open a new document
- Change the text
- Rotate and position the graphic
- Light the graphic
- Color the graphic
- Resize the graphic
- Add bevels & extrude
- Select characters
- Add shadows
- Create animations
- Creating cursor (CUR & ANI) files
- Importing 2D objects
- Apply the style of an existing graphic
- Create buttons, boards, boards + holes and borders
- Create screen savers
- Create Flash files
- Save and export
- Export options for GIF, PNG or BMP files
- Export options for JPG
- Export options for animated cursors (ANI)
- Export options for animated GIFs
- Export options for AVIs (movies and screen savers)
- Export options for screen savers (SCR)
- Export options for Flash bitmap format (SWF) files
- Export options for Flash vector format (SWF) files
- General info on AVI videos
- Exporting transparent title animations for movies
- Customize Xara 3D Maker
- Reference Section
- Legal

Changing the default document
If you want Xara 3D Maker to start up showing a different image:
1.
Create the image you want to use as the starting (default) image.
2.
Choose Save as default on the File menu.
This creates a file called Default.x3d, which appears in one of the following directories:
C:\Users\<User>\AppData\Local\Xara\Xara3D7 (if you are using Windows Vista or Windows
7)
C:\Documents and Settings\<User>\Local Settings\Application Data\xara\xara3D7 (if you are
using Windows XP)
Note:
Replace C in the above paths with the drive that Xara 3D Maker was installed on and <User> with your
own user name.
To revert to the standard default document:
Find the Default.x3d file that you previously saved as default in one of the above file paths and
delete the Default.x3d file. This restores the original default document, so that the next time you
open Xara 3D Maker, it reverts to displaying the standard new file image instead of the one you
created.
Changing quality settings
Th Settings option on the Window
menu lets you alter the quality settings for display and export (keyboard short cut Alt+Q). Usually the
default settings give excellent results, but you may wish to try different settings to fine-tune Xara 3D
Maker to your requirements.
Screen quality
controls the quality of the on-screen display. Increasing the quality setting means that the preview takes
longer to redraw on screen. Static and moving images have separate controls: animations can use a lower
setting.
Anti-aliasing
is a technique of blurring the edges between color transitions. Turning anti-aliasing on gives better results
but takes longer to redraw.
True perspective
displays the heading with slightly non-parallel sides (as if drawn from a distant vanishing point.) This gives
better results for some images than displaying parallel sides. The drawback is the extra processing can
slow down redraw. This may be noticeable when previewing animations.
Export quality
controls images exported as static bitmaps. Increasing the quality may give better results for some
Page 97