
7.0
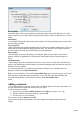
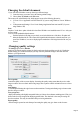
Table Of Contents
- Welcome to Xara 3D Maker 7
- Purchasing and unlocking Xara 3D Maker
- What's New in Xara 3D Maker Version 7
- Other Xara products
- Getting Help
- Working with Xara 3D Maker
- How To ...
- Quick overview
- Open a new document
- Change the text
- Rotate and position the graphic
- Light the graphic
- Color the graphic
- Resize the graphic
- Add bevels & extrude
- Select characters
- Add shadows
- Create animations
- Creating cursor (CUR & ANI) files
- Importing 2D objects
- Apply the style of an existing graphic
- Create buttons, boards, boards + holes and borders
- Create screen savers
- Create Flash files
- Save and export
- Export options for GIF, PNG or BMP files
- Export options for JPG
- Export options for animated cursors (ANI)
- Export options for animated GIFs
- Export options for AVIs (movies and screen savers)
- Export options for screen savers (SCR)
- Export options for Flash bitmap format (SWF) files
- Export options for Flash vector format (SWF) files
- General info on AVI videos
- Exporting transparent title animations for movies
- Customize Xara 3D Maker
- Reference Section
- Legal

Advanced customization
's customization options are recommended only for advanced users. They can be accessed by clicking
Customize from the Window menu, or by right clicking on a toolbar and selecting Customize
.
Note: If you experience a problem with your windows or toolbars at any time, or wish to return them to
their standard layout, click Reset user interface on the Window
menu.
Customize options are broken down into five areas:
Commands
Here you can add icons to a menu or the standard toolbar, and even create you own custom menu.
Click a category to see related commands to its right. You can drag any of the commands to the
standard toolbar where they will be added to allow easy access to that tool or feature in the future. To
remove a button, just right click it and select delete.
Commands can also be dragged to any of the menus. Or you can create your own menu. Click the New
Menu option then drag the New Menu command to the menu bar at the top of your screen. To give the
menu a custom name just right click it and select Button Appearance
. You can then drag icons to it as you would with a standard toolbar (described above).
If you right click an icon or menu option, and select Start Group
, a divider will appear between it and the previous icon or option (grayed out for the first option in the
list).
Right clicking an icon and selecting Image and Text
will show a text label with the icon?useful if you forget what an icon does. To show all text labels, see the
Toolbars option below.
Toolbars
Another way of choosing which toolbars and options to display. It is quicker to use the Window
menu to achieve the same results.
If you select the standard toolbar, text options or time line, clicking Show text labels
will show descriptive text below each button.
Note:
The Design toolbar's text will only show if the toolbar is docked horizontally across the page or is
undocked completely. The text will not display when it is in its default position at the bottom right of your
screen.
Keyboard
Here you can set the keyboard shortcuts. Click the relevant category then the command for which you
wish to assign or change a shortcut. Any present shortcut will be listed under Current Keys. You can
click it and select Remove
to remove that shortcut entirely.
To add a new shortcut, just click in the Press New Shortcut Key
box and type the shortcut. Press the actual keys, do not type it, i.e., do not type the word "Alt", press
the Alt button as if you were using the shortcut.
Menu
This allows you to customize the right click menus available in the main working area. These are
currently set to be relevant to the work in progress., i.e., if you right click a shadow, you get options
relating to shadow control.
If you wish to change these, select the relevant menu from the Context Menus list, then go back to the
Commands
Page 95