
7.0
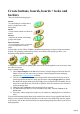
Table Of Contents
- Welcome to Xara 3D Maker 7
- Purchasing and unlocking Xara 3D Maker
- What's New in Xara 3D Maker Version 7
- Other Xara products
- Getting Help
- Working with Xara 3D Maker
- How To ...
- Quick overview
- Open a new document
- Change the text
- Rotate and position the graphic
- Light the graphic
- Color the graphic
- Resize the graphic
- Add bevels & extrude
- Select characters
- Add shadows
- Create animations
- Creating cursor (CUR & ANI) files
- Importing 2D objects
- Apply the style of an existing graphic
- Create buttons, boards, boards + holes and borders
- Create screen savers
- Create Flash files
- Save and export
- Export options for GIF, PNG or BMP files
- Export options for JPG
- Export options for animated cursors (ANI)
- Export options for animated GIFs
- Export options for AVIs (movies and screen savers)
- Export options for screen savers (SCR)
- Export options for Flash bitmap format (SWF) files
- Export options for Flash vector format (SWF) files
- General info on AVI videos
- Exporting transparent title animations for movies
- Customize Xara 3D Maker
- Reference Section
- Legal

Create screen savers
Screen savers protect the monitor screen from being burnt by a static image when the computer is not
being used and allow for a unique looking computer. Using Xara 3D Maker you can create a custom
screen saver either for use on your own computer or for distribution to other people.
Screen savers are always animated (because they need to show a moving image to avoid burning the
screen.) We suggest:
Use a dark-colored background, not white or other light colors.
Don't use light-colored text in areas that show little movement.
To create a screen saver:
1.
Create the animation in the regular way (see tips) or select from one of the sample screensaver
animations in the Sample, Screensavers folder (choose Open Sample from the File menu or use
the style picker).
2.
Choose Export screen saver on the File menu.
3.
Xara 3D Maker screen savers are effectively movies within a screen saver. (See also Export
options for AVIs (movies and screen savers) for AVI options). There are a number of preset
options. Low is one third of your current screen resolution, medium is half, high is two thirds and
full is your full screen resolution. You can also choose from a number of standard resolutions by
choosing other. We recommend selecting a value half the screen area. (For example 512x384 for
a 1024x769 screen area.) This should give a good quality image without creating a large file size.
4.
Choose either:
o
Install?this saves the screensaver and installs it as the default screen saver. The default folder
is your Windows system folder?this is the best folder to use. We recommend this option as it
is easier than manually installing a screen saver.
o
Save?this saves the screen saver but does not install it as the default screen saver.
5.
Enter a name for the screen saver file.
6.
Click Save.
Because Xara 3D Maker has to generate each frame of the animation, this process can take a few
minutes.
Previewing a screen saver file
1.
Browse to the screen saver (SCR) file.
2.
Right-click on the file. This pops-up a menu.
3.
Click Test to preview.
Using a screen saver file
If, in step 4, you installed the new screen saver as the default, everything is already set up for you. No
further action is necessary.
If you saved the screen saver to the Windows system folder:
1.
Click Start on the Taskbar. If you are using Windows XP, go to step 3.
2.
Choose Control Panel. Double-click Personalization.
3.
Click Screen Saver.The Screen Saver Settings dialog lists all screen savers in the system folder.
4.
Choose the screen saver you want.
5.
Click OK to make the selected screen saver the default.
If you saved the screen saver to a different folder:
1.
Browse to the screen saver file.
2.
Right-click on the file. This pops-up a menu.
3.
Click Install to select the screen saver. Then click OK to make the screen saver the default.
Page 54