
7.0
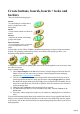
Table Of Contents
- Welcome to Xara 3D Maker 7
- Purchasing and unlocking Xara 3D Maker
- What's New in Xara 3D Maker Version 7
- Other Xara products
- Getting Help
- Working with Xara 3D Maker
- How To ...
- Quick overview
- Open a new document
- Change the text
- Rotate and position the graphic
- Light the graphic
- Color the graphic
- Resize the graphic
- Add bevels & extrude
- Select characters
- Add shadows
- Create animations
- Creating cursor (CUR & ANI) files
- Importing 2D objects
- Apply the style of an existing graphic
- Create buttons, boards, boards + holes and borders
- Create screen savers
- Create Flash files
- Save and export
- Export options for GIF, PNG or BMP files
- Export options for JPG
- Export options for animated cursors (ANI)
- Export options for animated GIFs
- Export options for AVIs (movies and screen savers)
- Export options for screen savers (SCR)
- Export options for Flash bitmap format (SWF) files
- Export options for Flash vector format (SWF) files
- General info on AVI videos
- Exporting transparent title animations for movies
- Customize Xara 3D Maker
- Reference Section
- Legal

Create buttons, boards, boards + holes and
borders
There are four different design types:
Boards.
Sit your heading on a solid board, so
the text extrudes from a solid
background.
Button.
Creates a button with the text flat on its
surface.
Borders.
Adds a border around your heading,
giving it more impact.
Board and holes.
As if you'd taken a saw to your board,
to give an impression of a cut-out
image.
You can either use one of Xara 3D Maker's predefined design shapes or import a shape from another
X3D file. The great thing is that one shape can be used with any of the design types above. One
design?four totally different combinations.
A design takes its values (bevel, lighting and so on) from the current graphic but you can of course select
new values if required.
Steps to creating a design:
1.
Choose Open Sample from the File menu to choose a sample design provided with Xara 3D
Maker or create your own text for the you design. Animated designs can show multi-page
messages?see Creating animations for details.
2.
Click one of the predefined shapes on the design toolbar on the bottom left of your screen, or
open design options and choose a design type from there using the Design picker. By default
this displays the designs folder (in the same folder where you installed Xara 3D Maker) but you
can browse to and choose any X3D, XAR or WEB file. If the file contains text, the first letter is
used as the design shape.
3.
Change the value in Stretch to make the design wider or narrower.
4.
For predefined design shapes you can control the corner radius. Uncheck Corners for the
default radius.
5.
If necessary, edit the design in the regular way, for example, by changing the bevel, extrusion or
colors.
You can create interesting design shapes using symbolic fonts such as Geotype (supplied with Xara 3D
Maker.) Create a graphic with just the character you want to use as the design shape. Save the graphic
as an X3D file. You can then use that X3D file as an imported design shape in the future if you save it to
the designs folder.
Page 52