
7.0

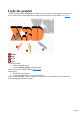
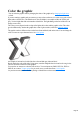
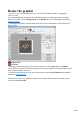
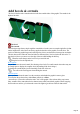
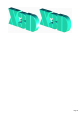
Table Of Contents
- Welcome to Xara 3D Maker 7
- Purchasing and unlocking Xara 3D Maker
- What's New in Xara 3D Maker Version 7
- Other Xara products
- Getting Help
- Working with Xara 3D Maker
- How To ...
- Quick overview
- Open a new document
- Change the text
- Rotate and position the graphic
- Light the graphic
- Color the graphic
- Resize the graphic
- Add bevels & extrude
- Select characters
- Add shadows
- Create animations
- Creating cursor (CUR & ANI) files
- Importing 2D objects
- Apply the style of an existing graphic
- Create buttons, boards, boards + holes and borders
- Create screen savers
- Create Flash files
- Save and export
- Export options for GIF, PNG or BMP files
- Export options for JPG
- Export options for animated cursors (ANI)
- Export options for animated GIFs
- Export options for AVIs (movies and screen savers)
- Export options for screen savers (SCR)
- Export options for Flash bitmap format (SWF) files
- Export options for Flash vector format (SWF) files
- General info on AVI videos
- Exporting transparent title animations for movies
- Customize Xara 3D Maker
- Reference Section
- Legal

Add bevels & extrude
The bevel is the decorative transition between the faces and the sides of the graphic. The extrude is the
depth of the sides.
The bevel
The extrude
Bevel designs range from a simple angled or rounded bevel on the corner to complex rippled bevels that
run the length of the sides. Bevels are always applied to the sides of the graphic, not to the faces. The
result is to make the graphic larger and, with larger bevel sizes, text characters can merge into each other.
This also has an effect when the faces and sides are different colors ? the bevel takes the side color. To
alter the bevel, hover you mouse over the edge of the text while holding the shift key.
When the cursor changes to the bevel tool you can click and
drag the bevel to the required size.
Bevel options
let you have more advanced control, like choosing a bevel style. For small extrude values there may not
be enough space to display the complete bevel (depending on the bevel design.)
To change the extrude depth, just click and drag on the side of the text.
You will see the cursor appear when altering the extrude.
Extrude options
gives you more advanced control over the extrusion, and whether the graphic is matt or gloss.
You can also choose the surface, either Gloss (reflective) or Matt
(non-reflective.) The surface affects the entire "feel" of the graphic. Gloss (shown below top) creates
shiny, metallic effects; matt (shown below bottom) more subtle, toned-down graphics. When swapping
between the two surfaces, you often need to move the lights to get the best results for that surface.
Page 28