
7.0
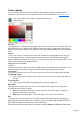

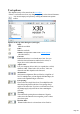
Table Of Contents
- Welcome to Xara 3D Maker 7
- Purchasing and unlocking Xara 3D Maker
- What's New in Xara 3D Maker Version 7
- Other Xara products
- Getting Help
- Working with Xara 3D Maker
- How To ...
- Quick overview
- Open a new document
- Change the text
- Rotate and position the graphic
- Light the graphic
- Color the graphic
- Resize the graphic
- Add bevels & extrude
- Select characters
- Add shadows
- Create animations
- Creating cursor (CUR & ANI) files
- Importing 2D objects
- Apply the style of an existing graphic
- Create buttons, boards, boards + holes and borders
- Create screen savers
- Create Flash files
- Save and export
- Export options for GIF, PNG or BMP files
- Export options for JPG
- Export options for animated cursors (ANI)
- Export options for animated GIFs
- Export options for AVIs (movies and screen savers)
- Export options for screen savers (SCR)
- Export options for Flash bitmap format (SWF) files
- Export options for Flash vector format (SWF) files
- General info on AVI videos
- Exporting transparent title animations for movies
- Customize Xara 3D Maker
- Reference Section
- Legal

Texture options
You can also display texture options by clicking this button in the
options toolbar.
This dialog box lets you apply and change textures applied to any part of the graphic or used as a
background behind the graphic. You can use textures to give an interesting effect to objects and/or the
background. You can easily drag a bitmap on to the background, text face or text sides. You can use
any BMP, ICO, PNG, JPEG or GIF file. Textures can also be set for buttons, boards and borders with
the options below. You cannot resize or rotate background textures as they need to be identical to the
texture used on your web page.
Drop-down list:
This lets you select which parts of the graphic or the background you want to add a texture to or change
the texture of.
Texture:
Check this to add a texture to the selected part of the graphic or background. Uncheck to use plain color
(no texture) on that area.
Tint
(dimmed for Background): You can use the color editor to tint a texture; this is similar to laying a colored
film on top of that texture.
Size
(dimmed for Background): Lets you resize the texture. Increasing the size can make obvious the
individual pixels that make up the texture although this can create some interesting effects.
X-Y:
Lets you move the texture horizontally or vertically.
Angle
(dimmed for Background): Lets you rotate the texture.
Load a texture:
Opens a dialog box where you can preview and choose which texture to load from either your hard disk
or other source.
Flash vector file format does not support textures. Selecting Display as Flash on the View
menu dims all options.
Page 150