
7.0
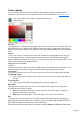

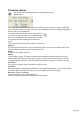
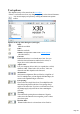
Table Of Contents
- Welcome to Xara 3D Maker 7
- Purchasing and unlocking Xara 3D Maker
- What's New in Xara 3D Maker Version 7
- Other Xara products
- Getting Help
- Working with Xara 3D Maker
- How To ...
- Quick overview
- Open a new document
- Change the text
- Rotate and position the graphic
- Light the graphic
- Color the graphic
- Resize the graphic
- Add bevels & extrude
- Select characters
- Add shadows
- Create animations
- Creating cursor (CUR & ANI) files
- Importing 2D objects
- Apply the style of an existing graphic
- Create buttons, boards, boards + holes and borders
- Create screen savers
- Create Flash files
- Save and export
- Export options for GIF, PNG or BMP files
- Export options for JPG
- Export options for animated cursors (ANI)
- Export options for animated GIFs
- Export options for AVIs (movies and screen savers)
- Export options for screen savers (SCR)
- Export options for Flash bitmap format (SWF) files
- Export options for Flash vector format (SWF) files
- General info on AVI videos
- Exporting transparent title animations for movies
- Customize Xara 3D Maker
- Reference Section
- Legal

values raise the selected characters above other characters.
Negative values lower the selected characters.
Kerning:
Dimmed when there is a selected area of text. This controls
the spacing between the pair of characters either side of the
cursor. This is similar to tracking except that kerning applies
to a pair of characters. Tracking applies to either all
characters or the characters in the selected area.
Line break:
This puts any characters or words to the right of the cursor
on a line below characters or words to the left. You can type
a line break character from the keyboard using Shift + Enter.
In the Text Options image above, there is a line break
between 'X3D' and 'version 7'.
Tip: You can also insert a line break by clicking Insert Line
Break on the Edit
menu.
Page break:
This is used when creating multi-page animations to separate
each page. You can type a page break character from the
keyboard using Enter. The preview window displays this
symbol when you insert a page break, as shown after 'X3D
version 7' in the Text Options image above.
Tip: You can also insert a page break by clicking Insert
Page Break on the Edit
menu.
Font list
This displays all the TrueType fonts installed on your computer, including those installed with Xara 3D
Maker. Selecting a font name previews the text in that font.
Note:
If you are using Windows 7 and have previously hidden rarely-used fonts in your Control Panel, these
fonts will not be displayed in the Xara 3D Maker text toolbar.
Preview window
- shows you the text. You can select text in this preview (by dragging or using the arrow keys) and then
apply any of the options in this dialog box to just the selection.
More
Click this to display the character map and a list of available character sets.
Character map:
This shows you the characters in the current character set. Most fonts do not include every possible
character?missing characters appear as either a blank or a small rectangle. Click on a character for an
enlarged view. Double-click on a character to inset it into the text.
Character sets:
Windows has two types of font: Regular, which has 256 characters, and Unicode fonts, which have many
more characters arranged into separate sets of 256 characters. A typical Unicode font might include
several different versions of Latin characters (Regular, Central European, Baltic) plus Cyrillic and Greek
alphabets.
The U
button is dimmed for regular fonts.
For Unicode fonts, unchecking U lists the basic character sets. Not all fonts include every character set;
available sets are shown with > to the left of the character set name. (The >
Page 148