
MX
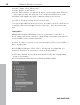
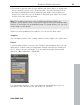
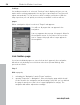

Table Of Contents
- Copyright
- Preface
- Customer service
- Before You Start
- Introduction
- What is MAGIX Website Maker MX?
- Definition of concepts: Webpage or website?
- Features
- What's new in MAGIX Website Maker MX
- Manage web uploads yourself
- Subpages with drop-down navigation and external links in the navigation.
- Insert HTML code:
- Adjust browser background and favicons
- Image viewing with the image slider.
- Your domain name of choice
- Create animated widgets
- Interactive photo & video gallery with impressive effects
- Create your own buttons
- Add Google Static Map
- The new, extra-fast multi-file upload function
- Quick start
- Interface – The layout of MAGIX Website Maker MX
- Website Maker functions
- Control Center functions
- MAGIX services in detail
- Glossary
- Index

Website Maker functions 51
www.magix.com
Style
Select
an object and then move the slider below "Opacity". The further you
move the slider to the left, the less opacity the object will have. It appears
brighter as the background shines through.
Would you like to change the color of the images on your website? Just color
them in:
1. Uncheck the "Selectively" box.
2. Reduce the opacity with the help of the slider (move the slider to the left).
3. Select the desired color in the "Colors" area.
Changes are immediately visible in the image.
Effects
Select one of your homepage's objects and choose from among the numerous
effects available in "Animation", "Filters", and "Blend". Under mouse actions,
you can assign objects specific actions through a mouse click, mouse-over or
mouse-out.
For some effects you can also specify space, angle, color, etc.
Trigger actions using the mouse.
If you would like to make your website even more interactive, use the option to
assign actions to certain objects though mouse clicks, mouse-overs and
mouse-outs.
Example: Proceeed as follows if you would like an object to fade into another
object when it is clicked:
1. Add the object which should appear later on the desired page, edit and
place it as you like.
2. You can see all objects found on the current page in the object list (below
"Pages"). Hide this object in the list so that it isn't always visible. To do so,
click on the eye behind the object name.
3. Now, insert the object to which you would like to assign the mouse action.
Edit and position it as you see fit.
4. Clicking the object, open the Properties Manager under FX > Effects. Under
"Mouse actions" click on "Add".