
MX


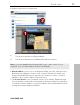
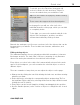

Table Of Contents
- Copyright
- Preface
- Customer service
- Before You Start
- Introduction
- What is MAGIX Website Maker MX?
- Definition of concepts: Webpage or website?
- Features
- What's new in MAGIX Website Maker MX
- Manage web uploads yourself
- Subpages with drop-down navigation and external links in the navigation.
- Insert HTML code:
- Adjust browser background and favicons
- Image viewing with the image slider.
- Your domain name of choice
- Create animated widgets
- Interactive photo & video gallery with impressive effects
- Create your own buttons
- Add Google Static Map
- The new, extra-fast multi-file upload function
- Quick start
- Interface – The layout of MAGIX Website Maker MX
- Website Maker functions
- Control Center functions
- MAGIX services in detail
- Glossary
- Index

20 Quick start
Tip: By pressing the "Shift" key while changing the object's size, the page ratio
can be locked, i.e. the object's width/length ratio will remain intact.
Loading new objects
Of course, you won't want to publish your website with the objects we have
provided as examples – your own images, photos, videos, music, and also
your own visitor counter and other extras can be integrated easily.
Loading your own objects (photos, videos, music) to your website:
1. Click on "My media" located beneath the workspace and select the
category "Uploaded".
2. O
pen the respective category (e.g. "Images").
3. Click the arrow button to upload, and then select the method which you
would like to use to upload.
4. Select the file(s) to be uploaded in the file selection dialog.
5. Drag the respective file with the mouse button pressed from the overview to
your website on the right, and place it over the image you would like to
replace.
www.magix.com