
MX


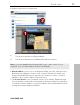
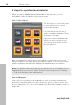
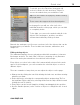

Table Of Contents
- Copyright
- Preface
- Customer service
- Before You Start
- Introduction
- What is MAGIX Website Maker MX?
- Definition of concepts: Webpage or website?
- Features
- What's new in MAGIX Website Maker MX
- Manage web uploads yourself
- Subpages with drop-down navigation and external links in the navigation.
- Insert HTML code:
- Adjust browser background and favicons
- Image viewing with the image slider.
- Your domain name of choice
- Create animated widgets
- Interactive photo & video gallery with impressive effects
- Create your own buttons
- Add Google Static Map
- The new, extra-fast multi-file upload function
- Quick start
- Interface – The layout of MAGIX Website Maker MX
- Website Maker functions
- Control Center functions
- MAGIX services in detail
- Glossary
- Index

Introduction 15
www.magix.com
online albums. You can specify features like order, alignment, and size of the
media as well as enlargement effects (lightbox or popup) via "Settings" in the
Properties Manager.
Tip: You can also drag an online album onto your website and then select
whether it should be displayed as a media player or gallery.
Create your own buttons
Buttons that can be embedded into your website are available in the Object
Manager under "Extras". Click on "Insert" to add the button template to the
current page. Now you can edit and move it freely. Click on the button's text to
access the text level where you can customize it.
Add Google Static Map
Now you can add a static image from Google Maps to your website (view page
45). This allows you to quickly enter destina
tions in a map, making it easier to
inform your website's visitors about a certain location.
The new, extra-fast multi-file upload function
Now MAGIX Website Maker MX has a new, easier-to-use, and quicker file
upload function. Starting now, individual files, multiple files, and even different
file formats may be uploaded in a single process to your Online World's web
storage. It couldn't be any quicker, safer, or more practical.
It's this easy:
Start MAGIX Website Maker MX and open the Object Manager. Now click on
"Upload". Use the "Select files" option to select media from your hard drive and
load them into your webspace.
Tip: To add only selected files to the upload list, hold the Ctrl key down while
you are selecting files. To upload all files of a folder, select the first file while
holding the Shift key and click on the last file.
After the upload has been completed, the corresponding web storage folder in
the Object Manager will open. Simply insert files into your website by selecting
the corresponding file and using drag & drop to add it to the workspace.
Alternatively, select the file and click the "Add“ button.