
5.0
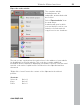

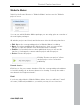
Table Of Contents
- Copyright
- Preface
- Customer Service
- Before you start
- Introduction
- What is MAGIX Website Maker 5?
- Definition of concepts: Webpage or website?
- Features
- What's new in MAGIX Website Maker 5
- Your domain name of choice
- Add Google Static Map
- Link to Facebook & Twitter
- Create animated Flash® widgets
- Upload and play animated GIFs
- Interactive photo & video gallery with impressive effects
- Photos presented as filmstrips or photo tables
- Create your own buttons
- Table templates for precise text management
- The new, extra-fast multi-file upload function
- 36 great visitor counters for your website
- FTP access to your webspace
- Quick start
- Interface – The layout of MAGIX Website Maker 5
- Website Maker functions
- Control Center functions
- MAGIX services in detail
- Glossary
- Index

Control Center functions 57
2. Customize
:
First, you have to upload files for the widget. If you've already uploaded files for
a Website Maker project, you will find them organized into the following areas:
pictures, videos, music, and other. If you haven't uploaded data for a Website
Maker project yet, please proceed as follows:
Click on this button and a small dialog will appear. By clicking on
"Select files", you can navigate to the files in question. Select them
and confirm by clicking "Open". Once all files are included in the list,
click on "Upload now".
Then click on "Insert" to add all files that you want to have presented by the
widget to the playlist to the left. Now you can customize the widget's size or
playback properties, etc. Once you have made all changes, click on
"Continue".
3. Insert:
In the third step, the code for the widget is displayed. This code needs to be
copied in order to be able to embed the widget into external HTML websites.
If you want to reuse or customize the widget at a later stage, you can save it
with a unique name and open and customize it later in the first step.
www.magix.com