
5.0
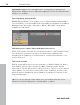
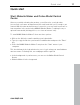
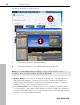
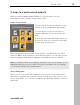
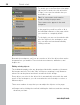
Table Of Contents
- Copyright
- Preface
- Customer Service
- Before you start
- Introduction
- What is MAGIX Website Maker 5?
- Definition of concepts: Webpage or website?
- Features
- What's new in MAGIX Website Maker 5
- Your domain name of choice
- Add Google Static Map
- Link to Facebook & Twitter
- Create animated Flash® widgets
- Upload and play animated GIFs
- Interactive photo & video gallery with impressive effects
- Photos presented as filmstrips or photo tables
- Create your own buttons
- Table templates for precise text management
- The new, extra-fast multi-file upload function
- 36 great visitor counters for your website
- FTP access to your webspace
- Quick start
- Interface – The layout of MAGIX Website Maker 5
- Website Maker functions
- Control Center functions
- MAGIX services in detail
- Glossary
- Index

Quick start 19
3 steps to a professional website
When you launch MAGIX Website Maker 5 for the first time, you can
immediately create a website in three quick steps.
Step 1: Select layout
The first step is to select the layout for your
website from several professional designs.
For each layout you also get a series of
suitable subpages. These are listed to the
right.
If there are some individual pages which you
don't need, then you can remove them with
a click on the check boxes.
Give your website a logical name. Every website you add can be accessed
again via "Open" in the main menu and edited as desire. You can save several
website templates with different subpages and publish them as required.
www.magix.com
Note: The website
name has nothing to do with the title of your website as it is
displayed when you access it online. This title is entered by you via "Settings
-> Text in the title bar of the web browser".
Step 2: Edit pages
Step 2 lets you customize your webpages to meet your exact requirements
and enrich everything with your own content (e.g. photos, videos, music, text,
effects, animations, etc.), since the templates are filled with example content to
begin with.