
User manual

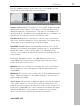
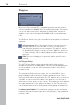
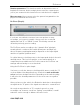

Table Of Contents
- Copyright
- Preface
- Table of Contents
- Support
- More about MAGIX
- Introduction
- Overview of the program screen
- Track window and constant control elements
- Import
- Cut sound – Working with objects
- Remove
- Enhance
- Export
- File Menu
- Edit Menu
- Effects Menu
- Options menu
- Standard mouse mode
- Cut mouse mode
- Zoom mode
- "Delete objects" mode
- Draw volume curve mouse mode
- 2 tracks
- Stereo display
- Comparisonics waveform display
- Activate Volume Curves
- Overview track
- Lock all objects
- Play parameter
- Units of measurement
- Mouse Grid Active
- Auto crossfade mode active
- Display values scale
- Path settings
- Tasks menu
- Online menu
- Help menu
- Keyboard layout and mouse-wheel support
- Activate additional functions
- Appendix: MPEG Encoder Settings
- MPEG glossary
- MPEG-4 encoder settings
- Index

72 Remove
www.magix.com
Zoom tool:
Left mouse button (click): Zoom in
Left mouse button (click and drag): Creates a zoom field
Right mouse button: Zoom out
Edit selection
With this setting you can specify how you wish to remove the
distortion. All selected distortions can be edited in the same way. If
you wish to use various editing methods in an audio file, you will have
to do it in various procedures.
The following methods are available to you:
1. Transitions: This method attempts to replace the distortion with
the help of the bordering parts of the music selection.
2. Transitions (Hard): Behaves like transitions, but has a more
powerful effect. This way, stronger distortions can be better
suppressed. The distortion, however, must be highlighted more
precisely.
3. Gap: This mode should be used for very short drop-outs.
4. Damping: This only makes the selected distortion quieter,
surrounding audio material is not faded in. This does not introduce
any artifacts, but can lead to an irritating silence, or even a
drop-out. Use this mode if a distortion is present in a very narrow
frequency range or if the surrounding noises are very quiet.
5. Fading in: Corresponds to dampening, only that here the music is
faded back in towards the end of the selection, i.e. it becomes
louder. This can be quite practical if an impulse-like distortion is
located at the beginning of a music track.
6. Fading out: Like fade ins, but in reverse, i.e. this mode is useful
for distortions at the end of a track.
Strength: Use this setting to meter your changes. A fully turned up
fader corresponds to a 100% change.
Left / right channel: Shows and calculates each channel. If the
distortion is only audible on one side, simply switch off the other
channel.
View
In the "View" menu you can select from various view schemes. The
schemes contain various color scales, but also varying time and
frequency resolutions.