
User manual

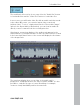
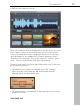

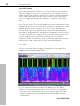
Table Of Contents
- Copyright
- Preface
- Table of Contents
- Support
- More about MAGIX
- Introduction
- Overview of the program screen
- Track window and constant control elements
- Import
- Cut sound – Working with objects
- Remove
- Enhance
- Export
- File Menu
- Edit Menu
- Effects Menu
- Options menu
- Standard mouse mode
- Cut mouse mode
- Zoom mode
- "Delete objects" mode
- Draw volume curve mouse mode
- 2 tracks
- Stereo display
- Comparisonics waveform display
- Activate Volume Curves
- Overview track
- Lock all objects
- Play parameter
- Units of measurement
- Mouse Grid Active
- Auto crossfade mode active
- Display values scale
- Path settings
- Tasks menu
- Online menu
- Help menu
- Keyboard layout and mouse-wheel support
- Activate additional functions
- Appendix: MPEG Encoder Settings
- MPEG glossary
- MPEG-4 encoder settings
- Index

Introduction 15
www.magix.com
The workflow in this section is very easy: Use the "Audio files" button
to load audio files and the "Video files" button to load video files.
In most cases you will load a video file with an audio track that needs
to be edited. Of course, you can also import video sound only
(without video). To do so, simply deactivate the "Show video image"
option in the Import dialog. Alternatively, you can load an audio file
directly or enter comments via the recording function.
After import, a waveform display of the audio track appears in the
main window. If you imported video as well, the video monitor located
in the lower right hand corner of the screen will display the first frame
of the image track.
The waveform display gives you an idea of the audio track's
progression. It displays where in the video sound is audible. It's also
possible to estimate the type of sound. Crackling, for example,
creates a clearly identifiable peak in the waveform.