
11.0


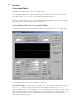

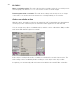
Table Of Contents
- Copyright
- Welcome
- System Requirements
- Contact
- Installation
- System settings
- What’s new in version 11?
- What's new since 10.2
- What's new since 10.1
- Screen elements
- Samplitude quickstart
- General functions in the project window
- Object-oriented audio editing
- Object editor
- Techniques for Working with Objects
- Integrating wave files as objects in the VIP
- Integrating sections from wave projects as objects
- The difference between loading and importing audio files.
- Integrating CD tracks as objects into VIP
- Selecting and Unselecting an Object
- Object handles
- Selecting and unselecting several objects, inverting the sel
- Moving objects
- Changing the length and start time of an object
- Duplicating, copying, and inserting objects
- Change waveform view
- Editing fades in the Object Editor or by using the handles.
- Object effects
- Locking objects
- Destructively editing an object
- Moving to a defined position
- Group/Ungroup objects
- Linking objects
- Overlapping objects
- Gluing objects
- Looping objects
- Trimming objects
- Replacing an audio file below the object
- Moving audio material below the object
- Managers
- Mixer
- Effects – Organization and work flow
- Effects and plug-ins in an overview
- Remix Agent
- Stereo Editor
- Surround Sound
- Creating a New VIP with the Mixer in Surround Format
- Converting an existing stereo VIP into a VIP with mixer in s
- Project Surround Setup
- Surround Panning
- Surround Panorama Module
- Panorama Modes of the Surround Panorama Module
- 2-channel surround mode
- Stereo and mono signal processing in surround projects
- Working reciprocally in Stereo and Surround Format
- Automation of the Surround Panorama Module
- Effects in Surround Projects
- Editing Surround Sound Automation
- Surround track bouncing
- MIDI in Samplitude
- MIDI Editors
- Open MIDI Editor
- Working with the MIDI Editor
- MIDI functions
- Quantize to grid
- Quantization - Window view
- Quantization settings
- Quantization settings - Preset
- Quantization setting - Q snap / Q length
- Quantization setting - N-tuplets (8, 5, 7)
- Quantization setting - Groove template
- Quantization setting - indicates beats/beat signature
- Quantization setting - Q threshold
- Quantization setting - Q window
- Select notes within the Q range
- Quantization setting - swing
- Quantization - Offset
- Quantization setting - humanize
- Quantization setting - Soft Q
- Standard quantization
- Undo quantization/reset
- Step recording via keyboard or controller keyboard
- Cell edit mode
- Velocity mode
- Piano Roll (Matrix Editor)
- Drum Editor
- Controller Editor
- List Editor (event list)
- Multi-object editing (MO editing)
- Score Editor
- (Samplitude Pro)
- Open Score Editor
- Score Edit modes
- Score sheet
- Editing MIDI data in the score sheet
- Adjusting and optimizing the score.
- Note allocation in multiple systems
- Multi-voice notation
- MIDI score settings
- Note system settings
- Display quantization
- Interpretation options
- Notation symbol
- Page format settings
- Print notes
- Tips
- Score music XML export
- MIDI editor shortcut keys
- Software-Instrumente/VST-Plug-ins/ReWire
- Installation of VST plug-ins
- Load software instruments
- Apply plug-ins at wave level
- Load plug-ins at object level
- Load plug-ins at track level
- Load plug-ins at master level
- Routing settings during software instrument loading
- VST MIDI out + Audio out recording
- Routing of VST instruments using the VSTi manager.
- Adjust instrument parameters
- Plug-in panel - graphic interface
- Plug-in parameter dialog
- Plug-in menu functions
- Play and monitor instruments live
- VST instrument preset selection
- Sidechain input
- Freeze plug-ins
- ReWire client application
- Automation
- Track automation - Basic approach
- Automation modes
- Object automation
- Master automation
- Automation – Context menu
- Curve generator
- MIDI controller automation
- VST plug-in/VST parameter dialog
- Automation recording in read mode
- Automation draw mode
- Edit automation curves
- Move automation curve with audio/MIDI data
- Automation/MIDI controller settings
- Synchronization
- Hardware controller
- Preset keyboard shortcuts
- Signal flow
- Glossary
- Active section
- Audio markers
- Automation
- AUX bus
- Clip
- Context menu
- Crossfade
- Destructive editing
- Fade
- Grid/Marker bar
- Handle
- Hybrid Engine and Economy Tracks
- Latency
- Latency comparison
- Level fader
- Lock key
- Marker
- Mouse modes
- Menu
- MIDI object
- Monitoring
- Objects
- Object Editor
- Object Mode
- Object-Orientated
- Play Cursor
- Range
- Routing
- Scroll bar
- Scrub
- Section
- Setup button in the VIP
- Status display
- Submix Bus
- Surround AUX bus
- Surround sound in Samplitude
- System Settings
- Tempo marker
- Time position input field
- Title bar
- Tool bar
- Tool Tips
- Track
- Virtual Project
- VirtClip
- Visualization
- Wave Projects
- Wave Editing
- Workspace
- Zoom
- Menu reference
- File menu
- New Virtual Project (VIP)
- Open
- Load/Import
- Save project
- Save project as
- Save project copy
- Save complete VIP in
- Save project as EDL
- Save project as template
- Burn project backup on CD/DVD
- Save object
- Save session
- Rename project
- Delete Wave Project(s)
- Delete virtual project (*.vip)
- Export audio
- Batch processing
- Disconnect Internet
- FTP download
- Close project
- Exit
- Used projects
- Edit menu
- View menu
- Track menu
- Insert new tracks
- Cut tracks
- Copy tracks
- Paste tracks
- Deletes tracks
- Track properties
- Track effects
- Track options
- Pan/Surround Editor (Stereo editor)
- VST Instrument Editor
- Track visualization
- Hide track
- Unhide all tracks
- Maximize track
- Minimize none
- Display subtracks
- Freeze track
- Edit track freeze
- Unfreeze track
- Alternative revolver tracks
- Activate next/previous track
- Object menu
- New object
- New synth object
- Cut objects
- Split objects
- Trim Objects
- Heal/Unsplit Objects
- Glue objects
- Freeze objects
- Lock objects
- Move/Edit objects/crossfade
- Mute object
- Build looped object
- Set hotspot
- Delete Hotspot
- Select objects
- Group objects
- Ungroup objects
- Object effects
- Object color/name
- Object Editor
- Object Manager
- Take Manager
- Take composer
- Wave Editing
- Edit a copy of wave content
- Edit Root VIP
- Automation menu
- Edit curve
- Delete all curves
- (Track) automation mode
- MIDI controller/automation
- Hide automation
- Display track automation
- Display object automation
- Display selected curves only
- Display unselected curves (cannot be activated)
- Display unselected curves (can be activated)
- Delete curve points
- Volume curve active
- Pan curve active
- Range menu
- Range all
- Move play cursor
- Edit range
- Move range start to left
- Move range start to right
- Move range end to left
- Move range end to right
- Range to start
- Range to end
- Flip range left
- Flip range right
- Beginning of range > 0
- Beginning of range < 0
- End of range > 0
- End of range < 0
- 0 > Range < 0
- Range start to left marker
- Start of range to left object edge
- Range end to right marker
- Set the end of the range to the right object edge
- Range over all selected objects
- Remove section
- Range over no track
- Range over current track
- Range over all tracks
- Range length to
- Split range
- Split range for video
- Store range
- Get range
- Get range length
- Store markers
- Get markers
- Markers to range borders
- Set Markers on Silence
- Comparisonics audio search
- Set new Audio marker
- Copy audio markers to VIP markers
- Copy VIP marker to audio marker
- Erase Marker
- Deletes Markers in Range
- Delete all markers
- Recall last range
- Range Editor
- Range Manager
- Edit time display
- Effects menu
- Notes on offline effect editing
- Extended options for destructive effect calculation
- Amplitude
- Dynamics (Overview)
- What compressors are available in Samplitude?
- Which compressor should be used and when?
- Dynamics (Compressor / Expander / Gate / Limiter)
- Advanced Dynamics
- Advanced dynamics – General controls and presets
- Advanced Dynamics – Editing the reference line (graphically)
- Advanced Dynamics – Editing the reference line (parametrical
- Gate
- Limiter
- Advanced Dynamics – Envelope
- Advanced Dynamics - Dynamic parameters
- Advanced Dynamics – Dynamic Scope
- Advanced Dynamics – Tips and tricks
- Multiband Dynamics
- Multiband Dynamics – Overview
- Multiband Dynamics – General controls
- Reference line
- Setup
- Bypass dyn. (bypass dynamics):
- Bypass all:
- Multiband Dynamics – Setups and parameters
- Parameters for the dynamic sections
- Parameters for the output:
- Mode
- Out (All)
- Limiter On/ Edit (only in the Master area of the mixer and i
- Separation frequencies
- Band separation (in the setup area)
- Multiband Dynamics – Filter bank for experts
- Tips & tricks: Strategies to cope with the flood of paramete
- Step 1: Global presets for all bands
- Step 2: Fine-tuning of individual bands
- Comparing at constant volume levels
- Reserved
- Multiband stereo enhancer
- sMAX11
- efx_Compressor
- am-munition, am-track, am-phibia, am-pulse
- Frequency/Filter
- Parametric equalizer
- EQ116
- Real-time (object) FFT filter/sound cloner
- Sound Cloner functionality
- Sound cloner controls
- FFT filter/spectral analysis (offline)
- FFT Analysis Filter – Getting Started
- 1. Filtering and frequency analysis
- 2. Filtering in "Direct draw" mode
- 3. "Dynamic filter" mode (fading between two filter curves).
- 4. Filtering a sample/object with the frequency response of
- 5. Transferring the frequency response (spectral envelope) f
- FFT Filter – Graphical view
- Overview of the curves
- Faders and zoom buttons
- Switch for the display views
- FFT Filter – Controls
- Filter
- Filter mode
- Draw mode
- FFT Filter – Expert dialog
- Analysis parameters
- Filter parameters
- Display
- Filter transition
- FFT Filter – The right settings
- Frequency analysis
- Filter
- FFT Filter – Problems & solutions
- Modulation effects when using extreme filter settings for lo
- Problems with the real-time preview when using higher rates:
- It is not possible to completely fade out individual parts o
- You have corrected the frequency response of a sample and an
- Resonance-like sounds occur even with broadband band passes.
- In the "Fade start" or "Fade end" filter mode, fading does n
- Brilliance Enhancer
- Filtox/De-esser
- Delay/Reverb
- Delay
- Room Simulator
- efx_Reverb/efx_StereoDelay
- Ecox/Variverb
- Time/Pitch
- Resampling / Timestretching / Pitchshifting
- Elastic Audio (Easy)
- Elastic Audio – General
- Elastic Audio - Editing modes
- Elastic Audio – "Relative" mode (not in Elastic Audio Easy)
- Overview of graphics in "Relative" mode
- Elastic Audio – "Direct" mode
- Overview of graphics in "Direct" mode
- Elastic Audio – Basics
- Opening Elastic Audio Editor
- Interaction between Elastic Audio Editor and objects in the
- Loading objects into the Elastic Audio Editor
- Elastic Audio - Control elements
- Edit VIP object
- Application of the Elastic Audio Editor
- Pitch slice objects and VIP objects
- Elastic Audio: Overview of keyboard commands and configurati
- Selecting slice objects and VIP objects
- Pitch automation including changes to the length (not in Ela
- Pitch automation without change in length (not in Elastic Au
- Pitch correction (intonation correction) with monophonic aud
- Manual correction of the whole pitch of a pitch slice
- Automatic correction of the whole pitch of a melody slice.
- Automatic correction of the pitch characteristic with quanti
- Correcting pitch increase or decrease
- Creating frequency modulations like warblers and vibrato
- Creating second voices or harmonizing effect (not in Elastic
- Distortion
- Restoration
- De-clipper
- De-clipper
- De-clicker/De-crackler
- DeHisser
- De-noiser – Remove unwanted noise
- De-noiser – Remove unwanted noise
- Get noise sample
- Remove DC offset (offline)
- Spectral Cleaning (offline)
- Spectral cleaning – the basics
- Spectral cleaning – operation
- Spectral cleaning – toolbar
- Spectral cleaning – Edit selection
- Spectral cleaning - Click markers
- Stereo/Phase
- Modulation/Special
- Sample manipulation
- Plug-ins...
- essentialFX
- MAGIX Plug-ins
- Further console elements:
- Analog Modeling Suite: am-track
- Analog Modelling Suite: am-pulse
- Analog Modeling Suite: am-phibia
- Analog Modelling Suite: am-munition
- CORVEX – Chorus/Flanger
- ECOX – Echo/Delay
- FILTOX – Multimode filter
- De-esser
- VariVerb Pro
- Vandal
- Particulars of Vandal
- Quick start via preset selection
- Tuner
- Input
- Stomp boxes
- Overdrive/Distortion
- Modulation effects
- Volume/Dynamics
- Filter/EQ
- Vandal - Amplifier
- Guitar amp
- Bass amp
- Cabinet simulation
- Vandal - Quick start with amp and cabinet simulation
- Rack effects (FX1/FX2)
- Scene memory
- Parameter control via MIDI and remote
- Edit left/right channel only
- Apply effects offline
- Tools menu
- Trackbouncing
- Range bouncing (internal mixdown)
- Remove unused samples
- Delete freeze data
- Compile project data
- Waveform Generator
- SMPTE Generator
- New manager...
- Managers
- Audio marker manager
- Start Windows Explorer
- Timestretch/Pitchshift Patcher
- Remix Agent – Tempo and beat recognition
- Remix Agent – Applications
- Remix Agent – Requirements
- Starting the Remix Agent
- Remix Agent – Working method
- Step 1: Tempo recognition
- Step 2: Check the automatic tempo and bar recognition
- Correction of beat positions and tempo
- Step 3: Determining the start of a bar:
- Step 4: Applying BPM and bar recognition
- Create remix objects
- Create remix objects – Audio quantization
- Remix objects in Loop mode
- Create remix objects – Set arrangement tempo to the object t
- Tempo alignment
- Apply arrangement tempo to object tempo
- Set arrangement tempo to object tempo
- Save tempo and bar info
- Playback menu
- Tempo menu
- Tempo/time signature
- Set new tempo marker
- Set new time signature
- Set new bar position marker
- Ignore all time markers / use project beat
- Working with tempo and beat markers
- Metronome active
- Metronome Options
- Audio quantization wizard
- Define transients
- Create MIDI trigger from transients
- Consolidate transients
- Split at transients
- Create groove template from transients
- Create groove
- Quantization settings - Preset
- Quantization settings - Grid
- Quantization setting - indicates beats/beat signature
- Quantization setting - Q threshold
- Quantization setting - Q window
- Quantization setting - swing
- Quantization setting - Soft Q
- Quantization - Offset
- Quantization setting - default
- Quantize object position
- Soft AQ
- Remove gaps between objects
- Undo/Redo/Reset quantization
- Reset object quantization
- Audio quantization – Tutorial
- MIDI menu
- New MIDI Object
- New MIDI track
- MIDI Editor
- Object Editor
- Glue MIDI Objects
- Trim MIDI objects
- MIDI bouncing
- Retrospective MIDI recording
- Demix MIDI objects by channels
- MIDI note quantize (standard)
- advanced MIDI quantization
- MIDI Humanize Q
- MIDI quantization settings...
- MIDI velocity dynamics settings
- Apply MIDI velocity dynamics
- Set MIDI velocity to fixed value
- Randomize MIDI velocity
- Track options
- Track MIDI Record
- MIDI controllers
- VST instrument editor
- MIDI Options
- MIDI Record Mode
- MIDI Panic – All Notes off
- CD/DVD menu
- Import audio CD track(s)
- Import audio DVD
- Set CD Track Index
- Set CD sub index
- Set CD pause index
- Set CD end index
- Set Track Indices on Silence
- Set track indices on object edges
- Set track indices on object edges - Options
- Remove index
- Remove all indices
- Make CD
- Create Audio DVD...
- Show CDR drive Information....
- Show CDR Disc Information...
- CD Track / Index Manager
- CD disc options
- CD text/ MP3 ID editor
- Set pause time
- Set start Pause Time....
- CD arrange mode
- Get FreeDB title info
- FreeDB options
- Search CD online and set track indices
- Audio ID
- Options menu
- Project properties
- Project options
- Track options
- Synchronization active
- Synchronization Setup
- MMC setup
- Program Preferences
- VIP mouse mode
- "Universal" mode
- Right mouse button: Context menu
- Left mouse button:
- "Range" mode
- Right mouse button: Context menu
- Left mouse button:
- Curve mode
- Right mouse button: Context menu
- Left mouse button
- Object mode
- Right mouse button: Context menu
- Left mouse button:
- Object and Curve Mode
- Right mouse button: Context menu
- Left mouse button
- Studio 4.00 mouse mode
- Right mouse button
- Left mouse button
- Object cut mode
- Right mouse button: Context menu
- Left mouse button
- Pitchshift/Timestretch mode
- Right mouse button: Context menu
- Left mouse button
- Draw Volume
- Right mouse button: Context menu
- Left Mouse Button: Free-hand draw function for volume curves
- Automation draw mode
- Right mouse button: Context menu
- Left mouse button
- Scrub Mode
- Right mouse button: Context menu
- Left mouse button:
- Zoom Mode
- Right mouse button: Zoom out
- Left mouse button: Zoom in
- Color mode
- Left mouse button: Set the object background color
- Right mouse button: Change the object waveform color
- Wave Project mouse mode
- Object mode
- Edit keyboard shortcuts and menu
- MIDI editor/Special buttons/Mouse wheel/Mouse
- Adjust toolbars
- Rest toolbars
- Grid Lines
- Font Selection
- Font for time display
- Font for the manager
- MIDI Options
- Metronome Options
- Audio Metronome
- MIDI Metronome
- Display options
- Color Setup
- Undo settings
- Dithering Options
- Advanced buffer settings
- Resampling quality options
- Lock settings
- Set pre-roll time
- Destructive effect calculation
- VIP mouse mode
- System options
- Window menu
- Cascade
- Tile
- Untile
- Arrange Icons
- Main Toolbar
- Main Toolbar 2
- Position bar
- Position bar 2
- Punch/ Play bar
- Mouse Mode Toolbar
- Range bar
- Grid toolbar
- Workspace bar
- Button bar
- Status bar
- Mixer
- Track Editor
- Time display
- Visualization
- Transport Control
- Manager
- Video Window
- Close all Windows
- Iconise all Wave Projects
- Hide all Wave Projects
- Half Height
- 1, 2, …
- Help menu
- Index

400 EDIT MENU
Move crossfade position: The end of the first object and the end of the second object are
moved equally. The buttons ++/--/+/- are used to set the crossfade length.
Permit asymmetrical crossfades: The fade offset settings of both objects are no longer
connected to one another and can therefore be set independently of one another.
Auto-crossfade active
With this option, all newly recorded or cut material in a VIP (or material that is dragged from
a wave project into a VIP track) has an automatic fade-in applied to its start and end.
You can assign every object a standard fade-in, and this can be edited in the "Object editor
fade" menu with "Get/Set global crossfade".
If two objects overlap in this mode, a realtime crossfade will occur at the intersection. The
fade settings can be modified by double-clicking on each object in the object editor.
If required, you can manually edit each intersection with the Crossfade Editor or handles.