
11.0
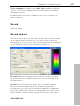


Table Of Contents
- Copyright
- Preface
- Support
- Before you start
- MAGIX News Center
- Introduction
- Tutorial
- Program desktop overview
- Mouse functions and mouse modes
- Button overview
- Functional overview
- Effects and effect plug-ins
- What effects are there, and how are they used?
- Saving effect parameters (preset mechanism)
- Dehisser
- Sound FX (object editor, mixer channels, mixmaster)
- Parametric equalizer (mixer channels, mix master)
- MAGIX Mastering Suite
- Vintage Effects Suite (track effects, mixer channels, mix ma
- Essential FX
- Vandal
- Track dynamics (track effects, mixer channels)
- Track delay/reverb (track effects)
- Elastic Audio easy
- Installation of VST plug-ins
- Effect calculations
- Samplitude 11 Producer as an external effects device
- Automation
- Mixer
- MIDI in Samplitude 11 Producer
- MIDI editor
- Software / VST instruments
- Installation of VST plug-ins
- Load instruments
- Routing settings during software instrument loading
- Load effects plug-ins
- Route MIDI instrument inputs
- Instruments with multi-channel outputs
- Adjust instrument parameters
- Play and monitor instruments live
- Routing of VST instruments using the VSTi manager.
- Preset management
- Freezing instruments (freeze)
- Tips on handling virtual instruments
- ReWire
- Synth objects
- Auto Jam Session
- Managers
- Surround sound
- Burning CDs
- File menu
- New Virtual Project (VIP)
- Open
- Load / Import
- Save project
- Save project as
- Save complete VIP in
- Save project as template
- Burn project backup on CD
- Save object
- Save session
- Rename project
- Delete HD wave project
- Delete virtual projects
- Export audio
- Make podcast
- Batch processing
- Connect to the Internet
- FTP download
- Send project via email
- Close project
- Exit
- Edit menu
- Menu view
- Track menu
- Object menu
- Range menu
- Effects menu
- Tools menu
- Playback / Record menu
- Menu tempo
- MIDI menu
- New MIDI object
- New MIDI track
- MIDI editor
- MIDI object editorCtrl + O
- Glue MIDI objects
- Trim MIDI objects
- MIDI bouncing
- Separate MIDI objects according to channels
- MIDI quantization (start and length)
- MIDI start quantization
- MIDI length quantization
- Cancel MIDI quantization
- Track information
- Track MIDI record
- VST instrument editor
- Metronome active
- Metronome settings
- MIDI settings
- MIDI record modes
- MIDI panic – All notes off
- CD menu
- Load audio CD track(s)
- Set track
- Set subindex
- Set pause
- Set CD end
- Set track markers automatically
- Set track indices on object edges
- Remove index
- Remove all indices
- Make CD
- Show CD-R drive information
- Show CD-R disc information
- CD track options
- CD disc options
- CD text / MPEG ID3 editor
- Set pause time
- Set start pause time
- CD arrange mode
- Get CD info (FreeDB Internet)
- FreeDB options
- Audio ID
- Options menu
- Window menu
- Tasks menu
- Online menu
- Help menu
- Preset keyboard shortcuts
- General settings
- Project settings
- Index

412 Playback / Record menu
www.magix.com
Sample rate: Select the audio file's sample rate. Make sure that your
sound card supports the selected sample rate.
Resampling to 44.1 kHz: Some Samplitude 11 Producer versions can
perform a real-time sample rate conversion to 44.1 kHz, if you are
recording with a different sample rate. For example, a DAT tape is
often recorded at 48 kHz, but the tape needs to mastered and
prepared for Red Book audio CD processing (44.1 kHz). Samplitude
11 Producer allows you to automatically convert the audio during the
recording, eliminating the additional sample rate conversion step after
the recording.
Device: This selects the desired device driver you want to use for the
recording. If you have more than one sound card installed in your
system, this window will let you specify which card to use. Make sure
the sound card is properly installed in Windows and is operational. If
you do not see an entry in this window, check whether a device
driver has been installed for your sound card. This usually is done
during the software installation for your sound card.
? (Device): By clicking the “?” button, you can check the recording
capabilities of the selected sound card, i.e. information about the
sound card driver and its capabilities.
Info: Dialog for detailing sound card properties. If your sound card
supports 24-bit recording, you can activate this recording mode via
the info dialog.
Playback while recording: Simultaneous recording and playback is
especially important when wanting to monitor existing tracks while
recording a new track. This option allows you to turn the feature on.
To conserve system resources and keep the recording error free on
slower systems, you may need to turn this feature off.
File name / Browse: The name of the audio file to be produced and
the pre-set index path are displayed at the bottom of the recording
window; both can be changed by clicking "File" button.
Set CD track marker: While the recording is running, you can set
track markers by clicking "Set CD track marker" in the recording
dialog.
Automatic recording stop: When this field is activated, recording
stops automatically after approximately 16 seconds of silence. This