
11.0

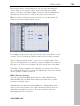
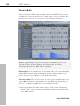
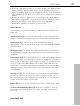
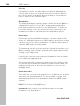
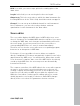
Table Of Contents
- Copyright
- Preface
- Support
- Before you start
- MAGIX News Center
- Introduction
- Tutorial
- Program desktop overview
- Mouse functions and mouse modes
- Button overview
- Functional overview
- Effects and effect plug-ins
- What effects are there, and how are they used?
- Saving effect parameters (preset mechanism)
- Dehisser
- Sound FX (object editor, mixer channels, mixmaster)
- Parametric equalizer (mixer channels, mix master)
- MAGIX Mastering Suite
- Vintage Effects Suite (track effects, mixer channels, mix ma
- Essential FX
- Vandal
- Track dynamics (track effects, mixer channels)
- Track delay/reverb (track effects)
- Elastic Audio easy
- Installation of VST plug-ins
- Effect calculations
- Samplitude 11 Producer as an external effects device
- Automation
- Mixer
- MIDI in Samplitude 11 Producer
- MIDI editor
- Software / VST instruments
- Installation of VST plug-ins
- Load instruments
- Routing settings during software instrument loading
- Load effects plug-ins
- Route MIDI instrument inputs
- Instruments with multi-channel outputs
- Adjust instrument parameters
- Play and monitor instruments live
- Routing of VST instruments using the VSTi manager.
- Preset management
- Freezing instruments (freeze)
- Tips on handling virtual instruments
- ReWire
- Synth objects
- Auto Jam Session
- Managers
- Surround sound
- Burning CDs
- File menu
- New Virtual Project (VIP)
- Open
- Load / Import
- Save project
- Save project as
- Save complete VIP in
- Save project as template
- Burn project backup on CD
- Save object
- Save session
- Rename project
- Delete HD wave project
- Delete virtual projects
- Export audio
- Make podcast
- Batch processing
- Connect to the Internet
- FTP download
- Send project via email
- Close project
- Exit
- Edit menu
- Menu view
- Track menu
- Object menu
- Range menu
- Effects menu
- Tools menu
- Playback / Record menu
- Menu tempo
- MIDI menu
- New MIDI object
- New MIDI track
- MIDI editor
- MIDI object editorCtrl + O
- Glue MIDI objects
- Trim MIDI objects
- MIDI bouncing
- Separate MIDI objects according to channels
- MIDI quantization (start and length)
- MIDI start quantization
- MIDI length quantization
- Cancel MIDI quantization
- Track information
- Track MIDI record
- VST instrument editor
- Metronome active
- Metronome settings
- MIDI settings
- MIDI record modes
- MIDI panic – All notes off
- CD menu
- Load audio CD track(s)
- Set track
- Set subindex
- Set pause
- Set CD end
- Set track markers automatically
- Set track indices on object edges
- Remove index
- Remove all indices
- Make CD
- Show CD-R drive information
- Show CD-R disc information
- CD track options
- CD disc options
- CD text / MPEG ID3 editor
- Set pause time
- Set start pause time
- CD arrange mode
- Get CD info (FreeDB Internet)
- FreeDB options
- Audio ID
- Options menu
- Window menu
- Tasks menu
- Online menu
- Help menu
- Preset keyboard shortcuts
- General settings
- Project settings
- Index

192 MIDI editor
www.magix.com
Tools
The controller editor has its own tools for editing curves and values.
Controller selection: A click on the menu area of the
button opens a selection menu in which the MIDI
controller for editing can be selected.
Selection: Combi tool also used for value changes as well
as freehand and line drawing.
Click in the upper range of a controller bar to modify the controller
value immediately using the draw function. Clicking in the lower two
thirds of the bar selects the corresponding note which is then
highlighted in red in the editors.
Select multiple controller bar by clicking and dragging or single
clicking a range in the controller editor; individual values can be
selected by clicking within the bar. Selected controller events will be
highlighted red.
Combi-tool editing options:
• Click on the bar end + drag: The controller value can now be
adjusted by dragging vertically. If you hold the "Shift" key down while
dragging, all of the selected events will be set to the same value. If
you also hold down "Ctrl", then the values of multiple selected
controllers will be changed relative to one another.
• Alt + Drag: This activates freehand drawing; the mouse pointer
becomes a pencil. By dragging in the corresponding controller area,
you can draw in any number of controller curves.
• Shift + Drag: This activates line drawing and the mouse pointer
becomes a cross hairs. By dragging horizontally, you can draw in
linear value curves (ramps).
Freehand drawing: Draws new controller value curves or
individual values by single clicking without dragging.
By dragging backwards, you can correct your curve during drawing.
Shift + Drag with the cross hairs to draw a line.
Draw lines: Uses the line function to insert a transition
between two different controller values.
Hint: If you edit velocity with the draw tools, no new notes are
generated; only existing velocity values are modified.