
11.0
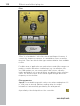


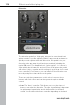
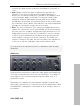
Table Of Contents
- Copyright
- Preface
- Support
- Before you start
- MAGIX News Center
- Introduction
- Tutorial
- Program desktop overview
- Mouse functions and mouse modes
- Button overview
- Functional overview
- Effects and effect plug-ins
- What effects are there, and how are they used?
- Saving effect parameters (preset mechanism)
- Dehisser
- Sound FX (object editor, mixer channels, mixmaster)
- Parametric equalizer (mixer channels, mix master)
- MAGIX Mastering Suite
- Vintage Effects Suite (track effects, mixer channels, mix ma
- Essential FX
- Vandal
- Track dynamics (track effects, mixer channels)
- Track delay/reverb (track effects)
- Elastic Audio easy
- Installation of VST plug-ins
- Effect calculations
- Samplitude 11 Producer as an external effects device
- Automation
- Mixer
- MIDI in Samplitude 11 Producer
- MIDI editor
- Software / VST instruments
- Installation of VST plug-ins
- Load instruments
- Routing settings during software instrument loading
- Load effects plug-ins
- Route MIDI instrument inputs
- Instruments with multi-channel outputs
- Adjust instrument parameters
- Play and monitor instruments live
- Routing of VST instruments using the VSTi manager.
- Preset management
- Freezing instruments (freeze)
- Tips on handling virtual instruments
- ReWire
- Synth objects
- Auto Jam Session
- Managers
- Surround sound
- Burning CDs
- File menu
- New Virtual Project (VIP)
- Open
- Load / Import
- Save project
- Save project as
- Save complete VIP in
- Save project as template
- Burn project backup on CD
- Save object
- Save session
- Rename project
- Delete HD wave project
- Delete virtual projects
- Export audio
- Make podcast
- Batch processing
- Connect to the Internet
- FTP download
- Send project via email
- Close project
- Exit
- Edit menu
- Menu view
- Track menu
- Object menu
- Range menu
- Effects menu
- Tools menu
- Playback / Record menu
- Menu tempo
- MIDI menu
- New MIDI object
- New MIDI track
- MIDI editor
- MIDI object editorCtrl + O
- Glue MIDI objects
- Trim MIDI objects
- MIDI bouncing
- Separate MIDI objects according to channels
- MIDI quantization (start and length)
- MIDI start quantization
- MIDI length quantization
- Cancel MIDI quantization
- Track information
- Track MIDI record
- VST instrument editor
- Metronome active
- Metronome settings
- MIDI settings
- MIDI record modes
- MIDI panic – All notes off
- CD menu
- Load audio CD track(s)
- Set track
- Set subindex
- Set pause
- Set CD end
- Set track markers automatically
- Set track indices on object edges
- Remove index
- Remove all indices
- Make CD
- Show CD-R drive information
- Show CD-R disc information
- CD track options
- CD disc options
- CD text / MPEG ID3 editor
- Set pause time
- Set start pause time
- CD arrange mode
- Get CD info (FreeDB Internet)
- FreeDB options
- Audio ID
- Options menu
- Window menu
- Tasks menu
- Online menu
- Help menu
- Preset keyboard shortcuts
- General settings
- Project settings
- Index

Effects and effect plug-ins 117
www.magix.com
sound of the guitar and the sound you are aiming for ("powerful" or
"cut").
• High: Mainly controls the share of highs before and after the
distortion. If you are not using an external guitar speaker as a
monitor, we recommend setting the controller to the middle position
or even moving it slightly to the right. This way the "sharp" highs
disappear, which all guitar amps generate without the suitable
loudspeaker. At the same time the mids stand out more, which gives
the sound more "kick". On the other hand you can further emphasize
the highs if you want the sound to be more neutral.
• Drive: The level of distortion. This controls the amplification used to
operate the "virtual valve circuit" (max. 60 dB). As the level increases,
the valve goes into overdrive and generates typical distortions. For a
slightly distorted sound ("crunch"), it's sufficient to set the controller
to 10-11 hours at maximum; the modeled circuit also provides the
usual "weight" for power rock chords, and more. The further you
turn this controller to the right, the more the mids of the signal move
to the fore so that the "high-gain" lead sound is better heard.
You can also use the distortion effect in combination with the amp
simulation!
BitMachine
Audio material can always be edited into high quality with Samplitude
11 Producer. Nevertheless, there are some situations, for example, a
more imperfect lo-fi sound would perfectly suit a drum loop or a
synthesizer sound.
Remember, for example, the first hardware samplers from the 80s
that usually only ran at 8 or 12-bit rates and at low sample rates. With
the BitMachine, changing the sound with such an "antique" device is
no problem.