
11.0

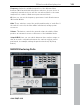
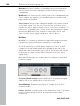

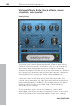

Table Of Contents
- Copyright
- Preface
- Support
- Before you start
- MAGIX News Center
- Introduction
- Tutorial
- Program desktop overview
- Mouse functions and mouse modes
- Button overview
- Functional overview
- Effects and effect plug-ins
- What effects are there, and how are they used?
- Saving effect parameters (preset mechanism)
- Dehisser
- Sound FX (object editor, mixer channels, mixmaster)
- Parametric equalizer (mixer channels, mix master)
- MAGIX Mastering Suite
- Vintage Effects Suite (track effects, mixer channels, mix ma
- Essential FX
- Vandal
- Track dynamics (track effects, mixer channels)
- Track delay/reverb (track effects)
- Elastic Audio easy
- Installation of VST plug-ins
- Effect calculations
- Samplitude 11 Producer as an external effects device
- Automation
- Mixer
- MIDI in Samplitude 11 Producer
- MIDI editor
- Software / VST instruments
- Installation of VST plug-ins
- Load instruments
- Routing settings during software instrument loading
- Load effects plug-ins
- Route MIDI instrument inputs
- Instruments with multi-channel outputs
- Adjust instrument parameters
- Play and monitor instruments live
- Routing of VST instruments using the VSTi manager.
- Preset management
- Freezing instruments (freeze)
- Tips on handling virtual instruments
- ReWire
- Synth objects
- Auto Jam Session
- Managers
- Surround sound
- Burning CDs
- File menu
- New Virtual Project (VIP)
- Open
- Load / Import
- Save project
- Save project as
- Save complete VIP in
- Save project as template
- Burn project backup on CD
- Save object
- Save session
- Rename project
- Delete HD wave project
- Delete virtual projects
- Export audio
- Make podcast
- Batch processing
- Connect to the Internet
- FTP download
- Send project via email
- Close project
- Exit
- Edit menu
- Menu view
- Track menu
- Object menu
- Range menu
- Effects menu
- Tools menu
- Playback / Record menu
- Menu tempo
- MIDI menu
- New MIDI object
- New MIDI track
- MIDI editor
- MIDI object editorCtrl + O
- Glue MIDI objects
- Trim MIDI objects
- MIDI bouncing
- Separate MIDI objects according to channels
- MIDI quantization (start and length)
- MIDI start quantization
- MIDI length quantization
- Cancel MIDI quantization
- Track information
- Track MIDI record
- VST instrument editor
- Metronome active
- Metronome settings
- MIDI settings
- MIDI record modes
- MIDI panic – All notes off
- CD menu
- Load audio CD track(s)
- Set track
- Set subindex
- Set pause
- Set CD end
- Set track markers automatically
- Set track indices on object edges
- Remove index
- Remove all indices
- Make CD
- Show CD-R drive information
- Show CD-R disc information
- CD track options
- CD disc options
- CD text / MPEG ID3 editor
- Set pause time
- Set start pause time
- CD arrange mode
- Get CD info (FreeDB Internet)
- FreeDB options
- Audio ID
- Options menu
- Window menu
- Tasks menu
- Online menu
- Help menu
- Preset keyboard shortcuts
- General settings
- Project settings
- Index

104 Effects and effect plug-ins
www.magix.com
Parametric equalizer
The parametric equalizer consists of four filter bands to form the
sound of the music track. Each band is a filter with a typical “bell
shape”. Within a certain frequency range around an adjustable middle
frequency you can increase or reduce the signal level gain. The width
of this frequency range is called bandwidth. The bandwidth is defined
by the Q value. The higher the Q value, the narrower and steeper the
filter curve.
You can influence the basic sound of the mix by increasing and
decreasing the broadband so as to give it more “depth” (lower center
200-600 Hz) or more “air” (Highs 10 kHz). You can also decrease the
narrow bandwidth (high Q value) in the frequency response to
remove, for example, disruptive frequencies.
Graphic: The resulting frequency path of the equalizer is displayed in
the graphic. The frequency is spread out horizontally, the increase or
decrease of the respective frequency, vertically. The blue bullets 1-4
symbolize the four wave bands. You can move them around with the
mouse until you find your desired frequency response.
Peak meter: With the peak meter you can control the output level of
the equalizer. The adjacent master gain controller can be used to
balance the level with the EQ.
Edit: The “Edit” button opens the fine tuning for the four bands:
Parameter selection: With the buttons on the right you can select the
parameter that can be adjusted with four faders of each band.
Furthermore, there are number keys to enter every parameter of the
bands.
Gain dB: These controllers allow you to raise or lower the filter.
Setting the controller to 0 deactivates the filter and doesn’t use CPU
power.
Freq. Hz: The center frequency of the individual filters can be set
between 10 Hz and 24 kHz with the frequency controllers. Freely
choosing the frequency enables multiple filters to be set to the same
frequency in order to have a greater effect.
Q (bandwidth): Here you can set the bandwidth of the individual
filters to between 10 Hz and 10 kHz.