
2013

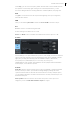
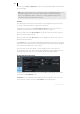
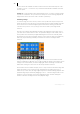
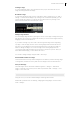
Table Of Contents
- Copyright
- Preface
- Support
- Introduction
- Tutorial
- Program desktop overview
- Functional overview
- Mouse functions and mouse modes
- Effects and effect plug-ins
- What effects are there, and how are they used?
- Saving effect parameters (preset mechanism)
- "Sound FX" (object editor, mixer channels, Mixmaster)
- Parametric equalizer (track effects, mixer channels, Mixmaster)
- MAGIX Mastering Suite
- Vintage Effects Suite (track effects, mixer channels, mix master)
- essential FX
- Vandal SE
- Analogue Modelling Suite: AM-Track SE
- Track dynamics
- Track delay/reverb (track effects)
- Elastic Audio Easy
- Automation
- Mixer
- MIDI in Samplitude Music Studio 2013
- Software / VST instruments
- Installing VST plug-ins
- Load instruments
- Loading routing settings with software instruments
- Load effects plug-ins
- Route MIDI instrument inputs
- Instruments with multi-channel outputs
- Adjust instrument parameters
- Play and monitor instruments live
- Routing VST instruments using the VSTi manager
- Preset management
- Freezing instruments (freeze)
- Tips on handling virtual instruments
- ReWire
- Tempo editing
- Synth objects
- Surround sound
- Synchronization
- Burning CDs
- Tools and wizards
- File menu
- Edit Menu
- Track menu
- Object menu
- Playback / Record menu
- Automation menu
- Effects menu
- CD menu
- Menu view
- The "Share" menu
- Help menu
- Help
- Help index
- Context help
- Open PDF manual
- Watch the introductory video
- Online tutorials
- About Samplitude Music Studio 2013
- MAGIX auto-update
- Open magix.info
- Product registration
- Download more instruments/Sounds/Soundpools
- Screen transfer - MAGIX Screenshare
- Restore original program settings
- MP3 Encoder activation
- Preset keyboard shortcuts
- General settings
- Project options
- If you still have questions
- More about MAGIX
- Index

78
www.magix.com
All saved ranges are displayed In the Range Manager, where they can be numerically
edited and recalled. The manager is found in the docker or can be opened via "Edit" >
"Range" > "Range editor".
Tip: All menu commands for range editing can be found in the menu reference "Edit"
> Range" (view page 346).
Wave projects
Wave projects include audio files. VIP objects reference to corresponding wave
projects open in the background. The reference solely the audio files and receive
working instructions as to what the computer is to do with these files.
All audio edits take place normally directly in the VIP and are "virtual" or "non-
destructive". This means that they are saved to the hard drive as a file only during
export In some cases it might be desirable to edit audio material directly already
during editing. In such cases you can find the associated audio file for each object via
the command menu "Object" > "Edit wave object".
Wave projects are for direct editing of data saved to the hard drive. This art of audio
editing is called "destructive", although editing steps can be reversed with Ctrl+Z (or
"Edit" > "Undo").
When a VIP is opened, you normally cannot see the individual wave windows. To
make them visible as icons, activate the "Wave projects to icons" options in "View" >
"Window". To make them disappear again, select "Hide wave projects".
In the title bar of the wave window you will find the project name, bit resolution,
sample length and the resulting disk space.
You can also load audio files without VIP and edit them in a virtual Wave Editing
Mode. For this the "Open wave projects in destructive mode" option must be
deactivated in Program Settings (Y). Files loaded via "File" > "Load audio file" will be
opened in a wave project, which works virtually, similar to a VIP.