
2013
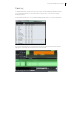

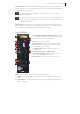
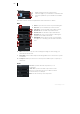
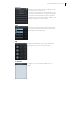


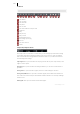
Table Of Contents
- Copyright
- Preface
- Support
- Introduction
- Tutorial
- Program desktop overview
- Functional overview
- Mouse functions and mouse modes
- Effects and effect plug-ins
- What effects are there, and how are they used?
- Saving effect parameters (preset mechanism)
- "Sound FX" (object editor, mixer channels, Mixmaster)
- Parametric equalizer (track effects, mixer channels, Mixmaster)
- MAGIX Mastering Suite
- Vintage Effects Suite (track effects, mixer channels, mix master)
- essential FX
- Vandal SE
- Analogue Modelling Suite: AM-Track SE
- Track dynamics
- Track delay/reverb (track effects)
- Elastic Audio Easy
- Automation
- Mixer
- MIDI in Samplitude Music Studio 2013
- Software / VST instruments
- Installing VST plug-ins
- Load instruments
- Loading routing settings with software instruments
- Load effects plug-ins
- Route MIDI instrument inputs
- Instruments with multi-channel outputs
- Adjust instrument parameters
- Play and monitor instruments live
- Routing VST instruments using the VSTi manager
- Preset management
- Freezing instruments (freeze)
- Tips on handling virtual instruments
- ReWire
- Tempo editing
- Synth objects
- Surround sound
- Synchronization
- Burning CDs
- Tools and wizards
- File menu
- Edit Menu
- Track menu
- Object menu
- Playback / Record menu
- Automation menu
- Effects menu
- CD menu
- Menu view
- The "Share" menu
- Help menu
- Help
- Help index
- Context help
- Open PDF manual
- Watch the introductory video
- Online tutorials
- About Samplitude Music Studio 2013
- MAGIX auto-update
- Open magix.info
- Product registration
- Download more instruments/Sounds/Soundpools
- Screen transfer - MAGIX Screenshare
- Restore original program settings
- MP3 Encoder activation
- Preset keyboard shortcuts
- General settings
- Project options
- If you still have questions
- More about MAGIX
- Index

Program desktop overview 55
Tempo section: You can adjust playback speed and tempo of the entire arrangement
in the tempo section of the transport control. All objects in the VIP will be adjusted in
their speed using timestretching.
The "Beat grid/snap (view page 60)" button enables you to activate and
display the beat grid.
Use the "CLICK" button to switch on the metronome click. Right clicking the
"CLICK" button opens the metronome options window to configure the pre-
counter and click volume.
Scrub Control: Using the Scrub Control wheel you can variably set playback speed.
This helps when searching for various audio passages. The buttons beneath it can be
used to start playback forwards and backwards at a slower speed.
Track Editor
1 Track number display and track name: A right-click
on the track name opens the "Track settings" dialog.
2 S: mutes all except the selected track.
3 M: mutes the selected track.
4 Record symbol: activates the track for recording.
5 Lock: prevents the objects in the track from being
accidentally moved or deleted.
6 Volume symbol: enables the input signal to be
previewed.
7 Volume entry field and volume control
8 Level control display: Both LED rows display the
input and output signal for the track.
9 Panorama: controls stereo position in the mix.
10 FX: opens the track effects settings of the activated track.
11 MIDI: sets the track to MIDI recording and opens the MIDI section in the Track
Editor.
12 Automation: is for Automation of MIDI controllers, VST parameters and certain
effects in the track.