
2013
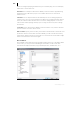
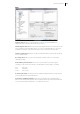


Table Of Contents
- Copyright
- Preface
- Support
- Introduction
- Tutorial
- Program desktop overview
- Functional overview
- Mouse functions and mouse modes
- Effects and effect plug-ins
- What effects are there, and how are they used?
- Saving effect parameters (preset mechanism)
- "Sound FX" (object editor, mixer channels, Mixmaster)
- Parametric equalizer (track effects, mixer channels, Mixmaster)
- MAGIX Mastering Suite
- Vintage Effects Suite (track effects, mixer channels, mix master)
- essential FX
- Vandal SE
- Analogue Modelling Suite: AM-Track SE
- Track dynamics
- Track delay/reverb (track effects)
- Elastic Audio Easy
- Automation
- Mixer
- MIDI in Samplitude Music Studio 2013
- Software / VST instruments
- Installing VST plug-ins
- Load instruments
- Loading routing settings with software instruments
- Load effects plug-ins
- Route MIDI instrument inputs
- Instruments with multi-channel outputs
- Adjust instrument parameters
- Play and monitor instruments live
- Routing VST instruments using the VSTi manager
- Preset management
- Freezing instruments (freeze)
- Tips on handling virtual instruments
- ReWire
- Tempo editing
- Synth objects
- Surround sound
- Synchronization
- Burning CDs
- Tools and wizards
- File menu
- Edit Menu
- Track menu
- Object menu
- Playback / Record menu
- Automation menu
- Effects menu
- CD menu
- Menu view
- The "Share" menu
- Help menu
- Help
- Help index
- Context help
- Open PDF manual
- Watch the introductory video
- Online tutorials
- About Samplitude Music Studio 2013
- MAGIX auto-update
- Open magix.info
- Product registration
- Download more instruments/Sounds/Soundpools
- Screen transfer - MAGIX Screenshare
- Restore original program settings
- MP3 Encoder activation
- Preset keyboard shortcuts
- General settings
- Project options
- If you still have questions
- More about MAGIX
- Index

458
www.magix.com
Before adapting an existing template to your controller, you should save it under a
new name using the "Save as..." option.
Now go to the "Adapt controller" tab. The following dialog appears:
Use Mackie Control if your controller can emulate this mode. In this case 7-bit values
are transmitted. You can see this in the MIDI Input Monitor. Pressing a displays a new
line, another line is displayed upon release. HUI receives 14-bit messages, i.e. two
lines respectively.
In the mixer, which should be open at the same time, you can now select the element
you wish to program on your controller. The saved function is displayed in the section
Program function, e.g. "Fader master" for the fader in the Samplitude Music Studio
2013 mixer. Alternatively, you can open the context menu in "Samplitude/Sequoia
function". This contains a list of all remotely controllable functions in Samplitude
Music Studio 2013. You can now assign them to your controller one after another.
The uppermost commands are purely mixer functions and are suited solely for the
controller connection. The lower ones represent the entire menu structure of
Samplitude Music Studio 2013. You can use this to assign each command from a
menu to a controller key. Please note that when working with menu commands, the
key lights of the controllers don't work.
Now move the fader or press the corresponding key on your controller. The MIDI data
for this element is displayed in the section "Last MIDI data". Press the Learn button to
allocate the new data to the function.
Note: Hardware controllers with touch-sensitive faders transmit data to Samplitude
Music Studio 2013 when released again, so that the "learn" button has to be pressed
after moving and before releasing a fader!
If you want to use a key/fader for multiple tracks, e.g. learn mute, select
"Mixer/Tracks/Track Mute" in "Samplitude Music Studio 2013 functions. Now tick
"Track "Auto Increment" and start programming the first track. After pressing
"Learn", the value of the track is automatically increased by "1". All you have to do is
to actuate the next element on your controller and press "Learn" again.
You can use the "Delete" button to unselect a function assignment. However, you can
also simply overwrite the data by "relearning".
If a controller should move in the wrong direction after programming, please repeat
the programming sequence and activate Invert Vpot direction upon button release.
If you want to know which functions have been assigned to a key of your controller,
simply press this key. The data appears in the list of assigned functions.