
2013

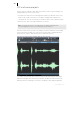

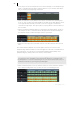
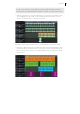
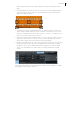

Table Of Contents
- Copyright
- Preface
- Support
- Introduction
- Tutorial
- Program desktop overview
- Functional overview
- Mouse functions and mouse modes
- Effects and effect plug-ins
- What effects are there, and how are they used?
- Saving effect parameters (preset mechanism)
- "Sound FX" (object editor, mixer channels, Mixmaster)
- Parametric equalizer (track effects, mixer channels, Mixmaster)
- MAGIX Mastering Suite
- Vintage Effects Suite (track effects, mixer channels, mix master)
- essential FX
- Vandal SE
- Analogue Modelling Suite: AM-Track SE
- Track dynamics
- Track delay/reverb (track effects)
- Elastic Audio Easy
- Automation
- Mixer
- MIDI in Samplitude Music Studio 2013
- Software / VST instruments
- Installing VST plug-ins
- Load instruments
- Loading routing settings with software instruments
- Load effects plug-ins
- Route MIDI instrument inputs
- Instruments with multi-channel outputs
- Adjust instrument parameters
- Play and monitor instruments live
- Routing VST instruments using the VSTi manager
- Preset management
- Freezing instruments (freeze)
- Tips on handling virtual instruments
- ReWire
- Tempo editing
- Synth objects
- Surround sound
- Synchronization
- Burning CDs
- Tools and wizards
- File menu
- Edit Menu
- Track menu
- Object menu
- Playback / Record menu
- Automation menu
- Effects menu
- CD menu
- Menu view
- The "Share" menu
- Help menu
- Help
- Help index
- Context help
- Open PDF manual
- Watch the introductory video
- Online tutorials
- About Samplitude Music Studio 2013
- MAGIX auto-update
- Open magix.info
- Product registration
- Download more instruments/Sounds/Soundpools
- Screen transfer - MAGIX Screenshare
- Restore original program settings
- MP3 Encoder activation
- Preset keyboard shortcuts
- General settings
- Project options
- If you still have questions
- More about MAGIX
- Index

Tutorial 39
entire rhythm tracks from short drum samples by simply stretching the object
apart.
• Two fade handles are found on both top corners, which can be dragged inwards
in order to fade the object in and out. The handle at the center can be used to
adjust the volume of objects.
• Several objects can be combined with others to make up a group, to avoid the
objects being unintentionally moved out of relation to each other. To do so, first
select the individual objects. Then select "Object" > "Group" > "Create group" (or
click in the tool bar on the "Group" symbol).
• All objects can be split into multiple objects. To do so, select the "Split objects" in
"Edit" menu under "Split" (or use the "T" key on your keyboard). The selected
object will be split at the position where the playback marker is.
• By right-clicking an object you can open a context menu where you can select the
object editor. The object editor is also integrated in the docker and constantly
available. It can be used to make all important settings for the corresponding
object. You can add effects to audio objects or change quantization of MIDI
objects.
The object editor is always open in the docker for easy access. It changes its settings
depending on which object is selected.