
2013
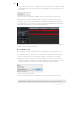

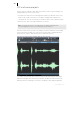

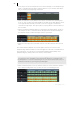
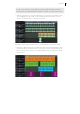
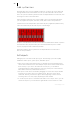
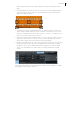

Table Of Contents
- Copyright
- Preface
- Support
- Introduction
- Tutorial
- Program desktop overview
- Functional overview
- Mouse functions and mouse modes
- Effects and effect plug-ins
- What effects are there, and how are they used?
- Saving effect parameters (preset mechanism)
- "Sound FX" (object editor, mixer channels, Mixmaster)
- Parametric equalizer (track effects, mixer channels, Mixmaster)
- MAGIX Mastering Suite
- Vintage Effects Suite (track effects, mixer channels, mix master)
- essential FX
- Vandal SE
- Analogue Modelling Suite: AM-Track SE
- Track dynamics
- Track delay/reverb (track effects)
- Elastic Audio Easy
- Automation
- Mixer
- MIDI in Samplitude Music Studio 2013
- Software / VST instruments
- Installing VST plug-ins
- Load instruments
- Loading routing settings with software instruments
- Load effects plug-ins
- Route MIDI instrument inputs
- Instruments with multi-channel outputs
- Adjust instrument parameters
- Play and monitor instruments live
- Routing VST instruments using the VSTi manager
- Preset management
- Freezing instruments (freeze)
- Tips on handling virtual instruments
- ReWire
- Tempo editing
- Synth objects
- Surround sound
- Synchronization
- Burning CDs
- Tools and wizards
- File menu
- Edit Menu
- Track menu
- Object menu
- Playback / Record menu
- Automation menu
- Effects menu
- CD menu
- Menu view
- The "Share" menu
- Help menu
- Help
- Help index
- Context help
- Open PDF manual
- Watch the introductory video
- Online tutorials
- About Samplitude Music Studio 2013
- MAGIX auto-update
- Open magix.info
- Product registration
- Download more instruments/Sounds/Soundpools
- Screen transfer - MAGIX Screenshare
- Restore original program settings
- MP3 Encoder activation
- Preset keyboard shortcuts
- General settings
- Project options
- If you still have questions
- More about MAGIX
- Index

Tutorial 35
peak of the wave form, the higher the volume will be. Press the space bar on your
keyboard to play back the wave project.
In wave projects you can directly edit your audio material. Direct editing of the
material is particularly useful: Mark a range in the wave project with the mouse and
then press "Del". After editing the audio material you can close the wave project. You
now have to decide whether you want to accept the changes or discard them. If you
want to accept the changes, then click on "Save project". The original audio file will
now be overwritten.
Arranging MAGIX Soundpool loops
Up until now, you have only been working with your own material. Next, we would
like to show you how to build your own songs using the included Soundpool loops.
MAGIX Soundpools offer professionally produced, short audio files - so-called
"samples". They have been produced to be perfectly combined with each other and
looped. "Looping" means creating an entire instrument track from a single audio
sample. This entails replaying the sample sequentially to provide the impression of a
repeating musical leitmotif. This process is used today in almost every area of modern
pop music.
• It's best to create a new, empty arrangement first. Click on "File" and select the
option "New virtual project (VIP)".
• Select the "Soundpool" tab in the docker (or "View" > "Manager" > "Soundpool
Manager"), to view the included soundpool samples.
• The "styles" are displayed on the left side of the Soundpool manager. If you have
inserted, for example, a MAGIX Soundpool DVD, you can select a style here.
Samplitude Music Studio 2013 shows "Rock" because this style is included.
• Next, you can select the instruments that you would like to use. At the start, we
recommend choosing a drum sample to create the initial percussive structure.
Open the "Drums" directory in the "Instruments" section.
• To preview, click once on a file in the file list. To load it, drag the desired file to
the track.