
2013
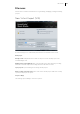

Table Of Contents
- Copyright
- Preface
- Support
- Introduction
- Tutorial
- Program desktop overview
- Functional overview
- Mouse functions and mouse modes
- Effects and effect plug-ins
- What effects are there, and how are they used?
- Saving effect parameters (preset mechanism)
- "Sound FX" (object editor, mixer channels, Mixmaster)
- Parametric equalizer (track effects, mixer channels, Mixmaster)
- MAGIX Mastering Suite
- Vintage Effects Suite (track effects, mixer channels, mix master)
- essential FX
- Vandal SE
- Analogue Modelling Suite: AM-Track SE
- Track dynamics
- Track delay/reverb (track effects)
- Elastic Audio Easy
- Automation
- Mixer
- MIDI in Samplitude Music Studio 2013
- Software / VST instruments
- Installing VST plug-ins
- Load instruments
- Loading routing settings with software instruments
- Load effects plug-ins
- Route MIDI instrument inputs
- Instruments with multi-channel outputs
- Adjust instrument parameters
- Play and monitor instruments live
- Routing VST instruments using the VSTi manager
- Preset management
- Freezing instruments (freeze)
- Tips on handling virtual instruments
- ReWire
- Tempo editing
- Synth objects
- Surround sound
- Synchronization
- Burning CDs
- Tools and wizards
- File menu
- Edit Menu
- Track menu
- Object menu
- Playback / Record menu
- Automation menu
- Effects menu
- CD menu
- Menu view
- The "Share" menu
- Help menu
- Help
- Help index
- Context help
- Open PDF manual
- Watch the introductory video
- Online tutorials
- About Samplitude Music Studio 2013
- MAGIX auto-update
- Open magix.info
- Product registration
- Download more instruments/Sounds/Soundpools
- Screen transfer - MAGIX Screenshare
- Restore original program settings
- MP3 Encoder activation
- Preset keyboard shortcuts
- General settings
- Project options
- If you still have questions
- More about MAGIX
- Index

318
www.magix.com
The track list dialog
Copy selected track(s): This button starts audio copy. All selected tracks will be
copied in a wav file or an HD wav project.
Play: Starts audio playback of the first selected track in the list (as a test).
Stop: Stops playback.
Pause: Pauses playback By clicking the play button, playback can be continued.
Select all tracks: All audio tracks will be selected, e. g. for copying the complete CD.
Tracks markings can also be created using Shift and Alt and arrow keys. Multiple
tracks can be selected by pressing "Ctrl + mouse click".
Get CD info (freeDB): Compares the created CD to the freeDB data base and fills out
metadata automatically.
Drive and speed selection: Here you can see the name of the current drive and set
read velocity. "Maximum" is the standard setting. If you notice read errors, gradually
decrease writing speed.
CD drive options: If you have more than one CD/DVD drive, you can set which you
want to be displayed here.
Write text file: Opens a TXT file with all information on the currently created CD.
Auto crossfade mode: The auto crossfade mode is turned on during import of audio
tracks. Crossfades will be automatically set between imported titles.
Take over CD track markers: If this option is activated, track markers will be set at
the start of imported tracks.
Save
The current project will be saved under the available name. If you have not yet
specified a name for your project, a dialog will open wherein Samplitude Music Studio
2013 asks you to do so.
Shortcut: Ctrl + S