
2013
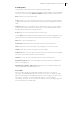
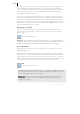
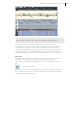
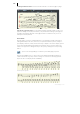
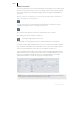
Table Of Contents
- Copyright
- Preface
- Support
- Introduction
- Tutorial
- Program desktop overview
- Functional overview
- Mouse functions and mouse modes
- Effects and effect plug-ins
- What effects are there, and how are they used?
- Saving effect parameters (preset mechanism)
- "Sound FX" (object editor, mixer channels, Mixmaster)
- Parametric equalizer (track effects, mixer channels, Mixmaster)
- MAGIX Mastering Suite
- Vintage Effects Suite (track effects, mixer channels, mix master)
- essential FX
- Vandal SE
- Analogue Modelling Suite: AM-Track SE
- Track dynamics
- Track delay/reverb (track effects)
- Elastic Audio Easy
- Automation
- Mixer
- MIDI in Samplitude Music Studio 2013
- Software / VST instruments
- Installing VST plug-ins
- Load instruments
- Loading routing settings with software instruments
- Load effects plug-ins
- Route MIDI instrument inputs
- Instruments with multi-channel outputs
- Adjust instrument parameters
- Play and monitor instruments live
- Routing VST instruments using the VSTi manager
- Preset management
- Freezing instruments (freeze)
- Tips on handling virtual instruments
- ReWire
- Tempo editing
- Synth objects
- Surround sound
- Synchronization
- Burning CDs
- Tools and wizards
- File menu
- Edit Menu
- Track menu
- Object menu
- Playback / Record menu
- Automation menu
- Effects menu
- CD menu
- Menu view
- The "Share" menu
- Help menu
- Help
- Help index
- Context help
- Open PDF manual
- Watch the introductory video
- Online tutorials
- About Samplitude Music Studio 2013
- MAGIX auto-update
- Open magix.info
- Product registration
- Download more instruments/Sounds/Soundpools
- Screen transfer - MAGIX Screenshare
- Restore original program settings
- MP3 Encoder activation
- Preset keyboard shortcuts
- General settings
- Project options
- If you still have questions
- More about MAGIX
- Index

MIDI in Samplitude Music Studio 2013 191
Cell mode
"Cell" mode serves to improve the overview as it limits the display to only the most
important information, note starting points, and velocity.
Each time position of a bar is displayed as a row of cells in on/off states. The note
length is not displayed, but rather a unified display width is used. This way, it all looks
similar to the step sequencer of a drum computer (see Robota (view page 260)).
The set qua
n
tization grid can be read from the width of cells. "Swing" and "Offset"
settings of the quantization options are also made clearer thanks to cells of various
widths and by repositioning.
The height of cells displays the velocity of the note. When drawing new drum notes
the velocity can be specified via the vertical drawing position within the cells. In
connection with the "Drum draw" mode, increasingly loud drum rolls can be drawn in
easily.
By clicking on the upper edge of a cell and dragging it vertically with the mouse, the
velocity can be adjusted directly without having to use the controller editor. In
"Velocity" mouse mode ("Ctrl + 5") it's even easier; all you need to do is click
anywhere on the cell.
Velocity
If this button is active, the bar height is used when displaying the velocity value of the
note. In all mouse modes (except for "Delete") the velocity can be changed by directly
clicking on a note without have to switch to the controller editor.
Drum Editor trackbox
In the drum editor, each individual note has its own trackbox, and individual settings
can be specified for each instrument. When zoomed out, each trackbox can be
increased in size with a simple mouse click.
S/M: Each individual instrument can be played solo (S) or muted (M).
Note number: The output note from the instrument can be set here. This can be
different to the note currently displayed in the MIDI object so that individual drum
instruments can be substituted. To put the display of notes back into the usual order
(deep notes at the bottom, highs at the top), click on "Map" at the top and use the
"Sort drum map" command.
Instrument name: Double clicking on this field lets you rename your drum instrument.