
2013
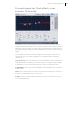
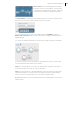

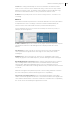

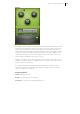
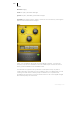
Table Of Contents
- Copyright
- Preface
- Support
- Introduction
- Tutorial
- Program desktop overview
- Functional overview
- Mouse functions and mouse modes
- Effects and effect plug-ins
- What effects are there, and how are they used?
- Saving effect parameters (preset mechanism)
- "Sound FX" (object editor, mixer channels, Mixmaster)
- Parametric equalizer (track effects, mixer channels, Mixmaster)
- MAGIX Mastering Suite
- Vintage Effects Suite (track effects, mixer channels, mix master)
- essential FX
- Vandal SE
- Analogue Modelling Suite: AM-Track SE
- Track dynamics
- Track delay/reverb (track effects)
- Elastic Audio Easy
- Automation
- Mixer
- MIDI in Samplitude Music Studio 2013
- Software / VST instruments
- Installing VST plug-ins
- Load instruments
- Loading routing settings with software instruments
- Load effects plug-ins
- Route MIDI instrument inputs
- Instruments with multi-channel outputs
- Adjust instrument parameters
- Play and monitor instruments live
- Routing VST instruments using the VSTi manager
- Preset management
- Freezing instruments (freeze)
- Tips on handling virtual instruments
- ReWire
- Tempo editing
- Synth objects
- Surround sound
- Synchronization
- Burning CDs
- Tools and wizards
- File menu
- Edit Menu
- Track menu
- Object menu
- Playback / Record menu
- Automation menu
- Effects menu
- CD menu
- Menu view
- The "Share" menu
- Help menu
- Help
- Help index
- Context help
- Open PDF manual
- Watch the introductory video
- Online tutorials
- About Samplitude Music Studio 2013
- MAGIX auto-update
- Open magix.info
- Product registration
- Download more instruments/Sounds/Soundpools
- Screen transfer - MAGIX Screenshare
- Restore original program settings
- MP3 Encoder activation
- Preset keyboard shortcuts
- General settings
- Project options
- If you still have questions
- More about MAGIX
- Index

Effects and effect plug-ins 103
Sensor field: The sensor field displays the resulting
frequency response of the equalizer´. The frequency
is displayed horizontally and the increase or decrease
of the respective frequency is displayed vertically.
The blue bullets 1-6 symbolize the six frequency bands. You can move them around
with the mouse until you find the frequency response you want.
You can control the output level of the equalizer with the Peak Meter . With the
Master Gain Controller beside it you can offset the level changes resulting from the
EQ adjustments.
You can access additional settings for each frequency band by clicking on the bullets.
You can use the knobs to set the values for each band. There is also a numeric field
for each parameter where values can be entered.
Gain: This controller allows you to raise or lower the filter. Setting the controller to 0
deactivates the filter so it does not use any CPU power.
Freq: The center frequency of the individual filters can be set between 10 Hz and 24
kHz with the frequency controller. Freely choosing the frequency enables multiple
filters to be set to the same frequency in order to have a greater effect.
Q (Bandwidth): Here you can set the bandwidth of the individual filters to between 10
Hz and 10 kHz.