
15.0


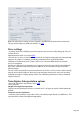
Table Of Contents
- Copyright
- Preface
- Support
- Before you start
- More about MAGIX
- Introduction
- Tutorial
- Program desktop overview
- Functional overview
- Working with objects in the VIP
- Ranges
- Working in wave projects
- Using markers
- Volume
- Output mode
- Record
- Tips & tricks
- Effects and effect plug-ins
- What effects are there, and how are they used?
- Saving effect parameters (preset mechanism)
- Dehisser
- Sound FX (object editor, mixer channels, mixmaster)
- Parametric equalizer (mixer channels, mix master)
- MAGIX Mastering Suite
- Vintage Effects Suite
- Track dynamics (track effects, mixer channels)
- Track delay/reverb (track effects)
- Elastic Audio
- General information on the Elastic Audio editor
- Edit window
- Axes labelling and legends
- Fundamentals of the Elastic Audio editor
- Description of all control elements
- Tools in the Elastic Audio easy editor
- Applications of the Elastic Audio easy editor
- Pitch-sliced-objects and VIP objects
- Fundamental frequency analysis correction
- Keyboard commands and mouse-wheel assignments
- Installation of VST plug-ins
- Effect calculations
- Samplitude Music Studio 15 as an external effects device
- Automation
- Automation modes
- Draw panorama mode
- Edit automation curves
- Move automation curve with audio / MIDI data
- Mixer
- MIDI in Samplitude Music Studio 15
- MIDI editor
- Notation display, movement, zoom
- Synchronized MIDI editor and VIP screen view
- MIDI editor multi-object editing (MO editing)
- Using the MIDI editor: Selecting events
- Editing events: Piano roll
- Controller editor
- List editor (midi event list)
- Drum editor
- Score editor
- Opening the score editor
- Score editor modes
- Linear view
- Page view
- The score
- Editing MIDI data in the score sheet
- Adjusting and optimizing the score
- Note allocation in multiple staves
- Multi-voice notation
- MIDI score settings dialog
- Stave settings
- Note display: Interpretation options
- Notation symbols
- Page format settings
- Printing score
- Print notes
- Quantize to grid
- MIDI editor shortcuts
- Software / VST instruments
- Installation of instruments and path settings
- Load instruments
- Routing settings during software instrument loading
- Load effects plug-ins
- Route MIDI instrument inputs
- Instruments with multi-channel outputs
- Adjust instrument parameters
- Play and monitor instruments live
- Routing of VST instruments using the VSTi manager.
- Preset management
- Freezing instruments (freeze)
- Tips on handling virtual instruments
- ReWire
- Synth objects
- Auto Jam Session
- Managers
- Surround sound
- Burning CDs
- File menu
- New Virtual Project (VIP)
- Open
- Loading / Importing
- Save project
- Save project as
- Save complete VIP in
- Save project as template
- Burn project backup on CD
- Save object
- Save session
- Rename project
- Delete HD wave project
- Delete virtual projects
- Export audio
- Make podcast
- Batch processing
- Connect to the Internet
- FTP download
- Send project via email
- Close project
- Exit
- Edit menu
- Menu view
- Track menu
- Object menu
- Range menu
- Real-time effects menu
- Offline effects menu
- Amplitude / Normalize
- Switch channels
- Stereo FX
- Invert phase
- Equalizer
- FFT equalizer
- Dynamics
- MultiMax
- Declipping
- Remove DC offset
- Dehisser
- Amp simulation
- Vocoder
- Room simulation
- Echo / Reverb
- Resample / Timestretching
- Change sample rate
- Reverse
- Build physical loop
- DirectX plug-ins
- Process only left (right) stereo channel
- Tools menu
- Playback / Record menu
- Menu tempo
- MIDI menu
- New MIDI object
- New MIDI track
- MIDI editor
- MIDI object editorCtrl + O
- Glue MIDI objects
- Trim MIDI objects
- MIDI bouncing
- Separate MIDI objects according to channels
- MIDI quantization (start and length)
- MIDI start quantization
- MIDI length quantization
- Cancel MIDI quantization
- Track information
- Track MIDI record
- VST instrument editor
- Metronome active
- Metronome settings
- MIDI options
- MIDI record modes
- MIDI panic – All notes off
- CD menu
- Load audio CD track(s)
- Set track
- Set subindex
- Set pause
- Set CD end
- Set track markers automatically
- Set track indices on object edges
- Remove index
- Remove all indices
- Make CD
- Show CD-R drive information
- Show CD-R disc information
- CD track options
- CD disc options
- CD text / MPEG ID3 editor
- Set pause time
- Set start pause time
- CD arrange mode
- Get CD info (FreeDB Internet)
- FreeDB options
- Audio ID
- Options menu
- Project properties
- Project options
- Track information
- Synchronization
- Program settings
- System / Audio
- Window menu
- Tasks menu
- Online menu
- Help menu
- Mouse functions and mouse modes
- Button overview
- Preset keyboard shortcuts
- General settings
- Project settings

Editing MIDI data in the score sheet
Selection
As usual you can select notes by clicking them. You can select a group of notes (e.g. a chord) by
sketching a frame over them while holding down the mouse button. Select multiple single notes by
pressing "Ctrl".
Note parameters
The parameters pitch, velocity, and length can be changed for one or several selected notes. If you have
selected one or several notes the data of the current note will appear in the info bar above the score
view. Changing a parameter may have a comparable effect on all selected notes, just like in the matrix
editor.
Move and transpose
To move notes, first select and then drag them to the desired position. Here the info box can help you
keep track of the pitch or position. The step size when moving is determined by the selected quantization
raster in the MIDI
editor.
Copy
Select the desired notes and copy them by holding down "Ctrl" and dragging the mouse. Alternatively,
you can also use the copy function of the edit menu.
Insert new notes
You can also insert new notes in the score editor by using the pen. Click on the desired position with the
pen, hold down the mouse button and, if necessary, correct the position and pitch. If you let go of the
mouse key, Samplitude Music Studio 15 will add a new note of the same length as the selected length
quantization value. You can only insert new notes into the active stave. For instance, to insert a note in
the lower part of a piano system, first click on the lower staff in the system on the left.
Only notes are inserted that correspond with the current pitch. Non-scale notes or chromatic
intermediate steps are skipped. When you enter conventional music material with the mouse, diatonic
insert mode increases the chances of hitting the correct note. If a new prefix is to be added to the note,
you can move the note chromatically with the arrow key. This way an inserted F in C major can be
transformed into an F# by pressing "Page up".
Delete notes
You can delete notes by:
selecting them and pressing "Del" or
by clicking on them with the eraser (or the right mouse button)
Insert notation symbols
Clef symbols can be inserted at the current cursor position by pressing the corresponding clef symbol in
the active system.
Delete notation symbol
Notation symbols such as clef and pitch cannot be selected, since they are meta information for the
notation display and no MIDI
events have been allocated to them. They can also be deleted by clicking them with the eraser (or the
Page 391