
15.0

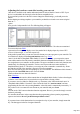


Table Of Contents
- Copyright
- Preface
- Support
- Before you start
- More about MAGIX
- Introduction
- Tutorial
- Program desktop overview
- Functional overview
- Working with objects in the VIP
- Ranges
- Working in wave projects
- Using markers
- Volume
- Output mode
- Record
- Tips & tricks
- Effects and effect plug-ins
- What effects are there, and how are they used?
- Saving effect parameters (preset mechanism)
- Dehisser
- Sound FX (object editor, mixer channels, mixmaster)
- Parametric equalizer (mixer channels, mix master)
- MAGIX Mastering Suite
- Vintage Effects Suite
- Track dynamics (track effects, mixer channels)
- Track delay/reverb (track effects)
- Elastic Audio
- General information on the Elastic Audio editor
- Edit window
- Axes labelling and legends
- Fundamentals of the Elastic Audio editor
- Description of all control elements
- Tools in the Elastic Audio easy editor
- Applications of the Elastic Audio easy editor
- Pitch-sliced-objects and VIP objects
- Fundamental frequency analysis correction
- Keyboard commands and mouse-wheel assignments
- Installation of VST plug-ins
- Effect calculations
- Samplitude Music Studio 15 as an external effects device
- Automation
- Automation modes
- Draw panorama mode
- Edit automation curves
- Move automation curve with audio / MIDI data
- Mixer
- MIDI in Samplitude Music Studio 15
- MIDI editor
- Notation display, movement, zoom
- Synchronized MIDI editor and VIP screen view
- MIDI editor multi-object editing (MO editing)
- Using the MIDI editor: Selecting events
- Editing events: Piano roll
- Controller editor
- List editor (midi event list)
- Drum editor
- Score editor
- Opening the score editor
- Score editor modes
- Linear view
- Page view
- The score
- Editing MIDI data in the score sheet
- Adjusting and optimizing the score
- Note allocation in multiple staves
- Multi-voice notation
- MIDI score settings dialog
- Stave settings
- Note display: Interpretation options
- Notation symbols
- Page format settings
- Printing score
- Print notes
- Quantize to grid
- MIDI editor shortcuts
- Software / VST instruments
- Installation of instruments and path settings
- Load instruments
- Routing settings during software instrument loading
- Load effects plug-ins
- Route MIDI instrument inputs
- Instruments with multi-channel outputs
- Adjust instrument parameters
- Play and monitor instruments live
- Routing of VST instruments using the VSTi manager.
- Preset management
- Freezing instruments (freeze)
- Tips on handling virtual instruments
- ReWire
- Synth objects
- Auto Jam Session
- Managers
- Surround sound
- Burning CDs
- File menu
- New Virtual Project (VIP)
- Open
- Loading / Importing
- Save project
- Save project as
- Save complete VIP in
- Save project as template
- Burn project backup on CD
- Save object
- Save session
- Rename project
- Delete HD wave project
- Delete virtual projects
- Export audio
- Make podcast
- Batch processing
- Connect to the Internet
- FTP download
- Send project via email
- Close project
- Exit
- Edit menu
- Menu view
- Track menu
- Object menu
- Range menu
- Real-time effects menu
- Offline effects menu
- Amplitude / Normalize
- Switch channels
- Stereo FX
- Invert phase
- Equalizer
- FFT equalizer
- Dynamics
- MultiMax
- Declipping
- Remove DC offset
- Dehisser
- Amp simulation
- Vocoder
- Room simulation
- Echo / Reverb
- Resample / Timestretching
- Change sample rate
- Reverse
- Build physical loop
- DirectX plug-ins
- Process only left (right) stereo channel
- Tools menu
- Playback / Record menu
- Menu tempo
- MIDI menu
- New MIDI object
- New MIDI track
- MIDI editor
- MIDI object editorCtrl + O
- Glue MIDI objects
- Trim MIDI objects
- MIDI bouncing
- Separate MIDI objects according to channels
- MIDI quantization (start and length)
- MIDI start quantization
- MIDI length quantization
- Cancel MIDI quantization
- Track information
- Track MIDI record
- VST instrument editor
- Metronome active
- Metronome settings
- MIDI options
- MIDI record modes
- MIDI panic – All notes off
- CD menu
- Load audio CD track(s)
- Set track
- Set subindex
- Set pause
- Set CD end
- Set track markers automatically
- Set track indices on object edges
- Remove index
- Remove all indices
- Make CD
- Show CD-R drive information
- Show CD-R disc information
- CD track options
- CD disc options
- CD text / MPEG ID3 editor
- Set pause time
- Set start pause time
- CD arrange mode
- Get CD info (FreeDB Internet)
- FreeDB options
- Audio ID
- Options menu
- Project properties
- Project options
- Track information
- Synchronization
- Program settings
- System / Audio
- Window menu
- Tasks menu
- Online menu
- Help menu
- Mouse functions and mouse modes
- Button overview
- Preset keyboard shortcuts
- General settings
- Project settings

Varipitch / Practice mode
Samplitude Music Studio 15 supports smooth changes of the pitch during playback, even in multitrack
projects (vertical slider in playback parameter window "P"). Activate "Varispeed" mode with the "active"
button, and then you can change the playback speed in various ways:
"Practice" mode: When practice mode is activated, the pitch remains constant regardless of the playing
speed. This mode is suitable particularly for pieces that have to be played more slowly for practice, e.g. a
guitar accompaniment, since otherwise excessive demands are made on the player.
Vertical slider: Changes the playback speed from -200% to +200%
Pitch factor: Lets you specify a certain pitch factor manually
Halftones: Lets you specify a value of halftones. The playback will be transposed the number of
halftones.
Internal rate: Here you can set a sample rate for the varipitch calculation. If you want to play a wave file
with a sample rate of 48 KHz but your sound card can only play rates up to 44.1 KHz simply set the
internal rate to 48 and activate varispeed. You hear the same result as playing back with real 48 KHz!
This function is also very useful for digital playback to DAT with 44.1 KHz samples and vice versa.
BPM: Here you can type in the original BPM value of your material and a destination bpm value, which is
reached using varipitch.
Important: Varipitch also works during recording! You can set the pitch to -2 halftones, sing a song into
the computer, then switch off varipitch... Your track is transposed two halftones higher!
Then, deactivate varispeed, and your voice will reach unknown highs. But be careful: You'll sound like
Mickey Mouse if you apply to much!
Key: P
Page 1077