
15.0


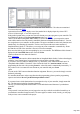

Table Of Contents
- Copyright
- Preface
- Support
- Before you start
- More about MAGIX
- Introduction
- Tutorial
- Program desktop overview
- Functional overview
- Working with objects in the VIP
- Ranges
- Working in wave projects
- Using markers
- Volume
- Output mode
- Record
- Tips & tricks
- Effects and effect plug-ins
- What effects are there, and how are they used?
- Saving effect parameters (preset mechanism)
- Dehisser
- Sound FX (object editor, mixer channels, mixmaster)
- Parametric equalizer (mixer channels, mix master)
- MAGIX Mastering Suite
- Vintage Effects Suite
- Track dynamics (track effects, mixer channels)
- Track delay/reverb (track effects)
- Elastic Audio
- General information on the Elastic Audio editor
- Edit window
- Axes labelling and legends
- Fundamentals of the Elastic Audio editor
- Description of all control elements
- Tools in the Elastic Audio easy editor
- Applications of the Elastic Audio easy editor
- Pitch-sliced-objects and VIP objects
- Fundamental frequency analysis correction
- Keyboard commands and mouse-wheel assignments
- Installation of VST plug-ins
- Effect calculations
- Samplitude Music Studio 15 as an external effects device
- Automation
- Automation modes
- Draw panorama mode
- Edit automation curves
- Move automation curve with audio / MIDI data
- Mixer
- MIDI in Samplitude Music Studio 15
- MIDI editor
- Notation display, movement, zoom
- Synchronized MIDI editor and VIP screen view
- MIDI editor multi-object editing (MO editing)
- Using the MIDI editor: Selecting events
- Editing events: Piano roll
- Controller editor
- List editor (midi event list)
- Drum editor
- Score editor
- Opening the score editor
- Score editor modes
- Linear view
- Page view
- The score
- Editing MIDI data in the score sheet
- Adjusting and optimizing the score
- Note allocation in multiple staves
- Multi-voice notation
- MIDI score settings dialog
- Stave settings
- Note display: Interpretation options
- Notation symbols
- Page format settings
- Printing score
- Print notes
- Quantize to grid
- MIDI editor shortcuts
- Software / VST instruments
- Installation of instruments and path settings
- Load instruments
- Routing settings during software instrument loading
- Load effects plug-ins
- Route MIDI instrument inputs
- Instruments with multi-channel outputs
- Adjust instrument parameters
- Play and monitor instruments live
- Routing of VST instruments using the VSTi manager.
- Preset management
- Freezing instruments (freeze)
- Tips on handling virtual instruments
- ReWire
- Synth objects
- Auto Jam Session
- Managers
- Surround sound
- Burning CDs
- File menu
- New Virtual Project (VIP)
- Open
- Loading / Importing
- Save project
- Save project as
- Save complete VIP in
- Save project as template
- Burn project backup on CD
- Save object
- Save session
- Rename project
- Delete HD wave project
- Delete virtual projects
- Export audio
- Make podcast
- Batch processing
- Connect to the Internet
- FTP download
- Send project via email
- Close project
- Exit
- Edit menu
- Menu view
- Track menu
- Object menu
- Range menu
- Real-time effects menu
- Offline effects menu
- Amplitude / Normalize
- Switch channels
- Stereo FX
- Invert phase
- Equalizer
- FFT equalizer
- Dynamics
- MultiMax
- Declipping
- Remove DC offset
- Dehisser
- Amp simulation
- Vocoder
- Room simulation
- Echo / Reverb
- Resample / Timestretching
- Change sample rate
- Reverse
- Build physical loop
- DirectX plug-ins
- Process only left (right) stereo channel
- Tools menu
- Playback / Record menu
- Menu tempo
- MIDI menu
- New MIDI object
- New MIDI track
- MIDI editor
- MIDI object editorCtrl + O
- Glue MIDI objects
- Trim MIDI objects
- MIDI bouncing
- Separate MIDI objects according to channels
- MIDI quantization (start and length)
- MIDI start quantization
- MIDI length quantization
- Cancel MIDI quantization
- Track information
- Track MIDI record
- VST instrument editor
- Metronome active
- Metronome settings
- MIDI options
- MIDI record modes
- MIDI panic – All notes off
- CD menu
- Load audio CD track(s)
- Set track
- Set subindex
- Set pause
- Set CD end
- Set track markers automatically
- Set track indices on object edges
- Remove index
- Remove all indices
- Make CD
- Show CD-R drive information
- Show CD-R disc information
- CD track options
- CD disc options
- CD text / MPEG ID3 editor
- Set pause time
- Set start pause time
- CD arrange mode
- Get CD info (FreeDB Internet)
- FreeDB options
- Audio ID
- Options menu
- Project properties
- Project options
- Track information
- Synchronization
- Program settings
- System / Audio
- Window menu
- Tasks menu
- Online menu
- Help menu
- Mouse functions and mouse modes
- Button overview
- Preset keyboard shortcuts
- General settings
- Project settings

Output
Deactivate:
If your PC does not have a motor fader, you can use this option to deactivate the transmission of
controller data.
Normal send: The MIDI
controller data is received and processed. Program data (e.g. fade changes in the mixer) are sent to the
controller.
Send echo:
The MIDI controller data is received and processed and forwarded straight back to the controller.
Controllers need this for their displays (lamps, LEDs). Program data (e.g. fade changes in the mixer) are
sent to the controller. If your controller has difficulties with this (e.g. .Logic Control), activate "Normal
send".
Send echo (without fader touch):
The MIDI controller data is received, processed and returned to the controller. However, the fader
values are not sent back while it is moved (activated fader touch). Only the last value is released to
prevent increased data volumes. Program data (e.g. fade changes in the mixer) are sent to the controller.
If your controller has difficulties with this (e.g. Logic Control), activate "Normal send".
Adjusting the hardware controller/creating your own set
Most devices available on the market understand protocols such as Mackie Control or HUI. If your
device is not included in the list simply select the nearest compatible device.
If you can't find your device in the list or want to change the default settings, you should proceed as
follows:
Before adapting an existing template to your controller you should save it under a new name using the "
Save as..."
option.
Now go to the "Adapt controller" tab. The following dialog will appear:
Use Mackie Control if your controller can emulate this mode. In this case 7-bit values are transmitted.
You can see this in the MIDI
input monitor. Pressing a key displays a new line, another line is displayed upon key release. HUI
receives 14-bit messages, i.e. two lines respectively.
In the parallel opened mixer you can now select the element you want to program on your controller. The
saved function is displayed in the Program function section, e.g. "Fader
master" for the fader in Samplitude Music Studio 15's mixer. Alternatively, you can open the context
menu which contains a list of all remotely controllable functions in Samplitude Music Studio 15. You can
now assign them to your controller one after another. The upper commands are mixer-only functions and
intended only for connecting the controller. The lower ones represent the entire menu structure of
Samplitude Music Studio 15. This allows you to assign any menu command to a controller key. Please
note that the test LED of the controller is not active for menu commands.
Page 1070