
User manual
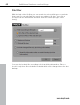

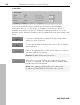


Table Of Contents
- Copyright
- Support
- Preface
- Before You Start
- More about MAGIX
- Introduction
- Quick start
- MAGIX PC Backup MX Overview
- Restore drive with rescue medium
- Transfer service
- Additional features and settings
- Tips & tricks - Problems & solutions
- MAGIX services in detail
- Glossary
- Index

Tips & tricks - Problems & solutions 67
www.magix.com
Set up free space as drive
When transferring data from a source hard drive to a larger hard drive, you can
determine what you want to do with the newly acquired disk space. You can
use it to enlarge a drive or to set up a new one. Errors may occur, however, so
that the free disk space cannot be assigned or set up as a drive.
How to proceed to set up free disk space as a new drive after the transfer,
so that is does not remain unused:
Note: More information on this topic can be found in the manual of your
operating system.
Step 1:
Set up free space as drive in Windows XP:
Select "Start > Settings > Control Panel > Administrative tools > Computer
management". The "Computer Management" dialog opens.
Set up free space as drive in Windows Vista
Select "Start > Control Panel > System & Maintenance" > "Management:
Create and format hard drive partition". The "Computer Management" dialog
opens.
Set up free space as drive in Windows 7
Select "Start > Control Panel > System & Security" > "Management: Create
and format hard drive partition". The "Computer Management" dialog opens.
Step 2:
Select "Disk Management" to the left. All hard drives (disks) and their partitions
are displayed to the right. On the new, larger hard drive there should also be a
section that is labeled as unassigned space. Right-clicking on this memory
section opens a context menu where you can start setting up a new volume.
Then you can open and use the memory under the drive letter you specified.