
User manual
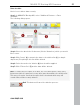
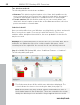


Table Of Contents
- Copyright
- Support
- Preface
- Before You Start
- More about MAGIX
- Introduction
- Quick start
- MAGIX PC Backup MX Overview
- Restore drive with rescue medium
- Transfer service
- Additional features and settings
- Tips & tricks - Problems & solutions
- MAGIX services in detail
- Glossary
- Index

56 Transfer service
Step 3: (Re)start your
PC and insert the boot disc while the PC boots. MAGIX
Restore will start and a welcome dialog pops up. Click on "Transfer service" in
the dialog. The following dialog appears:
Source: Displays all of the hard drives under "Source".
Target: Depending on the "Source", only those hard drives will be displayed
under "Target" that are large enough for the source. The target thus has to be
at least as large as the source hard drive.
Options: If the target hard drive is larger than the source hard drive, you have
3 options how to proceed with the rest of the memory:
Create a 1:1 copy and do not use the free disk space: The free disk space
remains on the hard drive and is not used. You can set it up as a drive (view
page 66) later via Windows, so it can be used.
Set up free d
isk space immediately as a new drive: This way, the disk space
will not remain unused and you have more space for saving your data.
Use free disk space to enlarge a specific drive of the target hard drive: If
you do not want to set up another drive, but do not want to leave the free
space unused either, you can enlarge a drive during transfer to the target hard
drive to make more disk space available there.
Step 4: Select a source and target, specify the option of your choice in case
free disk space is created and start the transfer by clicking on "Transfer".
The data of the source hard drive is transferred to the target. A message will
pop up when the transfer has been completed. You can restart your PC.
Warning!After the transfer, the rescue medium must be removed so that it is
not detected again automatically when the PC is restarted!
www.magix.com