
User manual
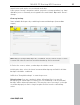

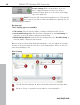

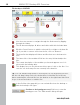
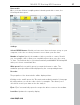
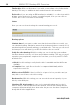
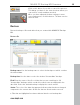
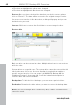
Table Of Contents
- Copyright
- Support
- Preface
- Before You Start
- More about MAGIX
- Introduction
- Quick start
- MAGIX PC Backup MX Overview
- Restore drive with rescue medium
- Transfer service
- Additional features and settings
- Tips & tricks - Problems & solutions
- MAGIX services in detail
- Glossary
- Index

MAGIX PC Backup MX Overview 35
The backup list that displays all of the drives that are to be backed up.
The future title of the backup. Click into the entry field and adjust the
title.
The format description of the medium you inserted appears once it is
detected in the burning drive.
This display lets you check how much free space is left on the disc. You
can also see how many files are currently in the burn list.
Tip: You can add files and folders to the burn list not only by pressing "Insert",
but also via drag & drop: Select the desired files, hold down the left mouse
button and drag the selected files into the window on the right-hand side. Now
let go of the mouse button to add the files.
In the file filter (view page 62) you can exclude files from the backup or
limit
the backup to file types.
If you would like to back up a lot of data, but don't want the backup to
become too large, you can increase the compression rate:
The backup file will be smaller, but the amount of time required to create it will
increase. If the compression rate is decreased, the time to create it is reduced,
but the size of the backup file will increase.
Create backup: Click on this button if the backup list is
complete. Select whether the backup is to be burned to
disc ("Continue to burn") or saved to your hard drive.
www.magix.com
If you
click on "Save to hard disk", you can change the storage location of the
backup if the default path doesn't meet your requirements. Click on "Save" to
start the backup.
Click on "Continue to burn" to open the adjusted burn dialog (view page 37).