
User manual
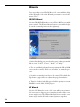
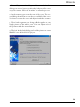
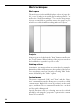

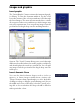
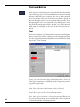
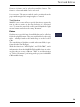
Table Of Contents

13
Wizards
1. First of all you scan the left part of the cover. In the first
dialog you can see how to position the left part of the cover
on your scanner. Click on “Acualize” to start the process.
2. In the next step you scan the rest of the cover. The sec-
ond dialog shows how to scan the second half of the cover.
You have to rotate the cover and adjust it with the scanner.
3. Then both segments are being added together to one
single picture of the whole cover. You can adjust each of
the pictures with the arrow buttons.
4. That’s it. In the forth dialog you load the picture as a new
MAGIX cover & label PLUS-project.