
User manual
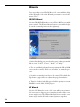
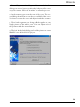

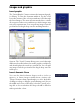
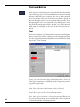
Table Of Contents

11
Tutorial
Adding text to the ”spine”: The narrow sides at the edges
of the CD box can be likewise furnished with text. The text
must be rotated 90 degrees.
The template for the inlay offers two narrow strips on both
the left and right for the sides. Write the two text lines in
the text dialog as they should appear on the sides, , and the
select the rotation option in the context menu (right mouse-
click on the text field). Now you can rotate the text 90
degrees and drag it onto the sides.
5. Printing
Before printing you should activate the print preview in
the file menu. If everything looks the way it should, open
the print dialog via the print button (or the menu option
”Print”).
Setting the paper format: An A4 format page is always
printed. The paper format is particularly important for pre-
fabricated CD/DVD label stickers, which are organized dif-
ferently on A4 paper depending upon the manufacturer.
You can select the paper format with the ”change paper
format” button. If you want to use prefabricated CD/DVD
label stickers, select a manufacturer in this dialog (e.g. Avery
Zweckform Art. Nr. 6043).
Calibrate: Use the calibrate function to co-ordinate the
print format with your printer. Beforehand, you should print
out some samples on normal paper. You can then use the
test prints to calibrate the print format so that the print lies
precisely within the perforations of the special paper.
Print: Once everything fits, place your valuable special
paper in the printer and print out the CD project.
Note: The working methods described are the same for all project
types; only the style sheets change. When printing a booklet, the
sides must be placed in the printer in a special way. Please use
the advice in the printer dialog!