
Installation Instructions


WARNINGS & CAUTIONS
WARNING:
Two people are required for safe installation. Take extra precautionary
measures to ensure a secure grip on the vanity base when lifting.
CAUTION:
The bathroom oor and wall must be nished prior to
installation of the vanity base.
CARE & MAINTENANCE
• To maintain the beauty of the furniture nish, avoid placing the vanity in direct sunlight.
• Avoid exposing the vanity to extreme temperatures by installing away from heat and air vents.
• Dust frequently with a clean, soft and dry cloth.
• Wipe away any water or liquid spills on the vanity base immediately with a clean, soft and dry cloth.
1: Removing old vanity (if applicable): 1) Turn o the water supply and take the drain out. 2) Disconnect the supply lines from the faucet.
3) Remove the old vanity top and vanity. NOTE: If the new vanity is not installed immediately, temporarily stu a rag into the drain pipe.
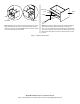
2: Using a level, locate any uneven oor and/or wall areas where your vanity will be installed. Unevenness can cause your vanity to
become misaligned resulting in twisting of the cabinet. Repair any uneven areas by reducing high spots or shimming low spots.
3: 1) Place the vanity in the desired position taking into account the location of your plumbing. 2) Ensure the vanity is level front to back
and at both sides.
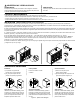
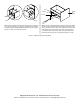
4: Attach the Handle for the doors by using the 1” screws, and the handle for the drawers by using the 1-1/2” screws.Figure 1.
5: Secure the vanity to the wall by inserting (x 2) #8 x 2” screws (B - not included) through the back rail of the vanity. Figure 2. NOTE: It
is recommended that the vanity be installed to at least one wall stud. If you are unable to locate wall studs, it is recommended that you
use wall anchors (C - not included) to secure the vanity.
6: Install the vanity top, faucet and drain (each not included) as per the instruction sheets provided with those items and ensure that
there is no leakage.
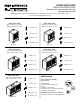
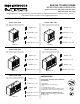
INSTALLATION Model 30100 shown in illustrations’
TROUBLESHOOTING
Problem:
1) Vanity doors or drawers rub against another surface.
2) There is an uneven gap between the doors or
drawers and cabinet.
Possible Cause:
Floor or vanity is not level.
Corrective Action:
1) Use a shim to ensure the vanity is level.
2) Adjust the door hinges or drawer slides.
Figures 3 and 4.
Side adjustment:
Using a Phillips screwdriver, rotate screw
(1) clockwise to move the door left and
counter-clockwise to move the door right.
Moves the door up to 2 mm.
Depth adjustment:
Using a Phillips screwdriver, rotate screw
(2) clockwise to move the door forward and
counter- clockwise to move the door backwards.
Moves the door up to 2 mm.
Height adjustment:
Using a Phillips screwdriver, rotate screw
(3) clockwise to move the door upward and
counter-clockwise to move the door
downward. Moves the door up to 2 mm.
Figure 2 - Adjusting Hinges
Figure 1 Figure 2
C
A
B