3 3
Product Registration Thank you for purchasing a Magic Chef® product. The first step to protect your new product is to complete the product registration on our website: www.mcappliance.com/register. The benefits of registering your product include the following: 1. Registering your product will allow us to contact you regarding a safety notification or product update. 2. Registering your product will allow for more efficient warranty service processing when warranty service is required. 3.
&217(176 ,PSRUWDQW 6DIHJXDUGV «««««««««« «««««««««««««««««« «« « ,QVWDOODWLRQ ,QVWUXFWLRQV ««««« « « ««««««««««««««« «« « %HIRUH :DVKLQJ 3UHSDUDWLRQ «««««««««« « « «« «««« ««««« «« « 3DUWV DQG )HDWXUHV «««««««««««« «« « «««««««««««««« «« « :DVKLQJ &\FOH *XLGH ««««««««««««««« «««««««««««««« «« « 0DLQWHQDQFH DQG &DUH (UURU &RGHV « ««««« ««««««««««««««« «« « 7URXEOHVKRRWLQJ «««««««««««««« «««««««««««««««« «« « :DUUDQW\ ,QIRUPDWLRQ «««««««««« ««««
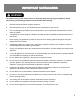
IMPORTANT SAFEGUARDS ! WARNING To reduce the risk of fire, electric shock, or personal injury when using your appliance, follow these basic precautionary guidelines, which includes the following: 1. Read all instructions before using the appliance. 2. Use this appliance only for its intended purpose as described in user manual. 3. Use only detergents or softeners as recommended for use in this manual and keep them out of the reach of children. 4.
17. Do not operate this washer unless all enclosure panels are properly installed. 18. Do not tamper with the controls. 19. Do not allow any children to play on or in the appliance. Close supervision of children is necessary when the appliance is used around them. 20. This appliance must be connected to a proper electrical outlet with the correct amount of electrical supply, as specified on the rating label. 21. Proper grounding must be ensured to reduce the risk of electric shock and fire.
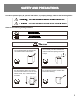
SAFETY AND PRECAUTIONS In order to prevent injury to yourself and others, or property damage, observe the following items: Observe the following visual guidelines: Do not disassemble and reassemble the washer without authorization. Do not insert your hand and take out clothes inside the spinning tub before it stops. Do not install the washer in moisture enriched environment in order to avoid electric shock, fire, or other electrical accidents. Do not directly rinse the machine with water when cleaning.
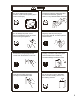
Do not let children climb onto the machine or peer into the spinning tub, in order to avoid injury. Prohibit from washing clothes that came in contact with kerosene, gasoline, alcohol, or any other flammable chemicals. Do not damage the power cord or plug to avoid electric shock, fire, and/or short-circuiting the appliance. Regularly clean the power plug to remove dust and dirt, in order to prevent electrical failure. Pull out the 3-pronged plug from the socket when the machine is not in use.
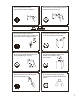
Use the correct power source: 3-pronged wall outlet (no adapters). Do not remove or insert the plug with wet hands to avoid electric shock. Ensure that the water inlet pipe is connected to a water source, and that the tap is opened prior to washing clothes. The water temperature shall not exceed 131oF when washing with hot water. Do not change or alter the power cord or the 3-pronged plug, in any way. It is strictly prohibited to place and sit children or lay weights on top of the washer.
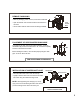
INSTALLATION INSTRUCTIONS REMOVE PACKAGING • Remove packaging, foam cushions, and bottom cardboard. • Open the washer door and take out all the accessories in Foam Cushion Base the drum. • Use of washer with the foam cushion is strictly prohibited. A PLACEMENT OF UPPER WATER DRAIN HOSE The height of the drain hose (A) should be between ~34 to 40”. Its diameter (B) should not be less than 1.20”, and its flow capacity should not be less than 40 L/Min.
:KHQ LQVWDOOLQJ WKH TXLFN VLQN DGDSWHU WR WKH VLQN IDXFHW IROORZ WKHVH JXLGHOLQHV 5HPRYH WKH DHUDWRU IURP \RXU IDXFHW QR]]OH DQG GHWHUPLQH WKH VL]H DQG W\SH RI WKH IDXFHW 2XWVLGH 7KUHDGHG (QG RU ,QVLGH 7KUHDGHG (QG If your faucet is inside threaded, insert the thick rubber washer into the silver faucet adapter. If your faucet is outside threaded, insert the thin rubber washer into the silver faucet adapter. Attach the silver faucet adapter to the sink faucet.
ASSEMBLE THE NOISE PROOF PLATE AND ADJUST THE FOOT. mounting screw If you don not want to use the HOT water supply hose, you must select Cold water as the wash temperature choice.
Delay Load Size Press the button, by washing quantity select water level position in reason. The indicator lights move at each press on the button, and light and flash in turn. Start/Pause Press the button to preset delay time. Less than 24 hours each press the button, the delay-time is added an hour. More than 24 hours each press the button, the delay-time is added 6 hours, after to 48 hours, the preset indicator come back origin status.
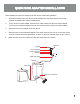
QUICK START GUIDE 1. Install the Washing Machine 1. Install the Washing Machine 9. Press the START/PAUSE Button 2. Properly Hang the Drain Pipe 8. Select the Desired Wash Cycle Program 3. Turn on the Water Supply 7. Close Washer Door Supply 6. Add Measured Detergent 4. Plug-in the Power Supply . 5.Load the Washer END OF WASH CYCLE • When the washing machine stops, the buzzer will sound for 6 seconds, and then the washer will automatically power down. • Turn off the water tap afterwards.
MAIN WASHING PROCEDURE INSTRUCTIONS FOR NORMAL WASH PROGRAM • The Heavy wash cycle program is the easiest, most convenient and common wash cycle program to use. When the user presses the ON/OFF button and then immediately presses the START/PAUSE button, the Heavy wash cycle program is activated. • When the washing machine begins the program, the digital display will show the remaining time. The indicator light will flicker to show the remaining time for the wash cycle program. STEPS IN DETAIL 1.
SPECIAL FUNCTIONS DELAY FUNCTION DELAY FUNCTION LAYOUT The washing machine can be delayed by using this preset feature: 1. Switch the power to ON. 2. Open the water tap and hang the drain hose. 3. Load the laundry and detergent into the washer. 4. Select the appropriate water level according to the laundry load (quantity of clothing articles). 5. Select the appropriate functions and programs. 6. Press the DELAY button to select the amount of time to delay the washing cycle. 7.
Load Size Default Scope Wash Time (about) including soak time Heavy Large Sm, Med, Lg 12 min 2 5 min 42 min Quick Large Sm, Med, Lg 3 min 1 30 sec 10 min Jeans Large Sm, Med, Lg 17 min 2 1 min 10 sec 42 min Anti-Wrinkle Large Sm, Med, Lg 12 min 2 - 34 min Normal Large Sm Med Lg Air Dry Large - Program Rinse Times Final Spin Time Total Time 1 1 1 - - 36 min 44 min 50 min 57 min 60 min
MAINTENANCE AND CARE / ERROR CODES MAINTENANCE END OF PROGRAM The washing machine will sound off a buzz at the end of any program operation to remind the user to take out the laundry or to operate it again. After the sound, the washing machine returns to its OFF state with no display and all indicator lights turned off. Please shut off the water tap, pull out the power plug when not in use to avoid water leakage or accidental fire.
TROUBLESHOOTING When the washing machine needs servicing, please contact our customer service department, and a representative will try and diagnose issues regarding your appliance. Please do not dismantle the washing machine without prior permission. Doing so will void your warranty. If the washing machine fails to operate properly, or it sounds an alarm, please check the follow guidelines for possible solutions to common problems or alarm indicators.
3 3
CNA International, Inc. d/b/a MC Appliance Corporation. All rights reserved. Magic Chef® logo is a registered trademark of CNA International, Inc. www.mcappliance.
3 3
Registración del producto Gracias por comprar el producto Magic Chef®. El primer paso para proteger su nuevo producto es completar la forma de registración en nuestra pagina web: www.mcappliance.com/register. Los beneficios de registrar su producto incluyen lo siguiente: 1. Al registrar su producto nos permite contactarle para notificarle de un cambio de seguridad o actualización del producto. 2.
ÍNDICE Indicaciones de seguridad importantes """""""""""""""."""""."".." 22 Instrucciones de instalación ".""."............."...."""""""""""""""."".." 27 Preparación antes del lavado "..""."""""....".."..""."""".."""""."".." 29 Partes y características "."..""..""""....""."."""""""""""""".""." 30 Guía de ciclos de lavado """.".."""""""".""""""""""""""."".." 32 Cuidado y mantenimiento / Códigos de error ".."".."""..""""""""""."".." 35 Solución de problemas """.""""".""....."""""""""""""""".""..
INDICACIONES DE SEGURIDAD IMPORTANTES Para reducir el riesgo de incendio, choque eléctrico o lesiones personales al usar su electrodoméstico, siga estas pautas básicas de precaución, que incluyen lo siguiente: 1. Lea todas las instrucciones antes de usar este aparato. 2. Este aparato sólo se debe usar con el propósito para el que se diseñó tal como se describe en este manual. 3. Use solo detergentes o suavizantes recomendados en este manual y manténgalos lejos del alcance de los niños. 4.
18. No sabotee los controles. 19. No permita que los niños jueguen dentro o encima del aparato. Mantenga una vigilancia estricta del aparato cuando se use cerca de niños. 20. Este aparato debe conectarse a un tomacorriente adecuado con la capacidad eléctrica correcta según se especifica en la etiqueta con el valor nominal. 21. Debe asegurarse una adecuada conexión a tierra para reducir el riesgo de descargas eléctricas e incendios. No corte ni elimine la conexión a tierra.
SEGURIDAD Y PRECAUCIONES Con el fin de evitar lesiones a usted y otras personas, o daños materiales, siga estas indicaciones: Siga estas indicaciones visuales: No desensamble ni ensamble la lavadora sin autorización . No introduzca su mano ni saque prendas de la tina giratoria antes de que se detenga . No instale la lavadora en un ambiente muy húmedo para evitar una descarga eléctrica, incendio u otros accidentes eléctricos. No enjuague directamente la máquina con agua cuando la limpie.
Evite lesiones: no permita que los niños se suban a la máquina ni se asomen a la tina giratoria. No lave prendas que hayan estado en contacto con keroseno, gasolina, alcohol ni otros químicos inflamables. No dañe el cable ni el enchufe eléctrico para evitar una descarga, incendio o cortocircuito en el aparato. Limpie con regularidad el enchufe eléctrico para eliminar polvo y suciedad con el fin de evitar una falla eléctrica. Quite el enchufe trifásico del tomacorriente cuando la máquina no esté en uso.
Utilice una fuente eléctrica correcta. Tomacorriente trifásico (sin adaptadores). No quite ni inserte el enchufe con las manos húmedas para evitar descargas eléctricas. Asegúrese de que el tubo de entrada de agua esté conectado a una fuente de agua y que el grifo esté abierto antes de lavar la ropa. La temperatura del agua no deberá exceder los 131º F cuando lave con agua caliente. No cambie ni altere de ninguna forma el cable de alimentación eléctrica ni el enchufe trifásico.
INSTRUCCIONES DE INSTALACIÓ INSTALACIÓN DESEMBALAJE • Quite el embalaje, los cojines de espuma y el cartón de la parte inferior. Base de cojín de espuma • Abra la puerta de la lavadora y saque los accesorios. • Está estrictamente prohibido usar la lavadora con el cojín de espuma colocado. A COLOCACIÓN DE MANGUERA DE DRENADO DE AGUA SUPERIOR La manguera de drenado (A) deberá estar a una altura de 34 a 40 pulgadas. Su diámetro (B) no deberá ser menos de 1.
INSTALACIÓ INSTALACIÓN RÁ RÁPIDA CON EL ADAPTADOR PARA FREGADERO Cuando instale el adaptador para fregadero al grifo del fregadero, siga estos pasos: 1. Quite el aireador de la boquilla del grifo y determine el tamaÿ y tipo de grifo (roscado interior o exterior) 2. Si su grifo está roscado por dentro, inserte la arandela gruesa de goma en el adaptador plateado del grifo. Si el grifo está roscado por fuera, inserte la arandela delgada de goma en el adaptador plateado del grifo. 3.
Quite la placa antirruido del envoltorio. Incline la máquina e inserte la placa antirruido en la base de la unidad. La abertura de la placa antirruido está en la parte inferior de la máquina. Placa antirruido Tornillo de montaje Pata ajustable Si no desea usar la manguera de entrada de agua CALIENTE, debe seleccionar agua FRÍA como temperatura de lavado.
PANEL DE CONTROL INICIO/PAUSA RETARDO Presione este botón para preestablecer la función de retardo. Para menos de 24 horas, cada vez que oprima el botón, el tiempo de retardo aumenta una hora. Para más de 24 horas, cada vez que oprima el botón, el tiempo de retardo aumenta seis horas. Después de 48 horas, el indicador volverá a cero. NIVEL DE AGUA Presione este botón para seleccionar el nivel de agua. Las luces indicadoras se moverán cada vez que se oprima el botón.
GUÍ GUÍA DE INICIO RÁ RÁPIDO 1. Instale la lavadora 9. Presione el botón START/PAUSE (INICIO/PAUSA) 8. Seleccione el programa del ciclo de lavado deseado 2. Cargue la lavadora 7. Conecte la alimentación eléctrica 3. Agregue el detergente 6. Abra el suministro de agua 4. Cierre la puerta de la lavadora 5. Cuelgue de manera correcta el tubo de drenado FIN DEL CICLO DE LAVADO • Cuando se detenga la lavadora, el timbre sonará durante 6 segundos y luego la lavadora se apagará automáticamente.
PROCEDIMIENTO DE LAVADO PRINCIPAL INSTRUCCIONES PARA UN PROGRAMA DE LAVADO NORMAL • El programa de ciclo de lavado Heavy es el más sencillo, cómodo y común de los programas de ciclo de lavado. Cuando el usuario oprime el botón ON/OFF (Encendido) e inmediatamente presiona el botón START/PAUSE, se activa el programa de ciclo de lavado Heavy. • Cuando la lavadora comienza el programa, la pantalla digital mostrará el tiempo restante.
FUNCIONES ESPECIALES FUNCIÓN DE RETARDO La lavadora se puede retardar usando esta función preestablecida: CONFIGURACIÓN DE LA FUNCIÓN DE RETARDO Presione el botón DELAY (RETARDO) y agregue UNA HORA en el indicador digital de retardo. Después de que el número alcance 24, oprima el botón DELAY y agregue SEIS HORAS a la función de retardo. Después de que el número alcance 48, el indicador digital de retardo se apagará y volverá al estado preestablecido. 1. ENCIENDA la máquina. 2.
CUIDADO Y MANTENIMIENTO / CÓDIGOS DE ERROR MANTENIMIENTO FIN DE PROGRAMA La lavadora sonará un timbre al final de cualquier programa para recordarle al usuario que debe sacar la carga o repetir el ciclo. Use paños suaves para limpiar el agua y los residuos de suciedad de la superficie de la lavadora después de cada uso. Después del sonido, la lavadora regresará al estado APAGADO con la pantalla y las luces indicadoras apagadas. No se permite el uso de detergentes, propelentes ni otros químicos.
SOLUCIÓ SOLUCIÓN DE PROBLEMAS Cuando la lavadora necesite servicio, comuníquese con nuestro departamento de servicio al cliente y un representante buscará y diagnosticará los problemas que tenga su aparato. No desmonte la lavadora sin permiso previo. De hacerlo se invalidaría la garantía. Si la lavadora no funciona adecuadamente o suena una alarma, revise las siguientes indicaciones para encontrar posibles soluciones a problemas comunes o indicaciones de alarma .
3 3
CNA International, Inc. realiza negocios bajo el nombre de MC Appliance Corporation. Derechos reservados. El logotipo Magic Chef® es una marca registrada de CNA International, Inc. www.mcappliance.