
Installation Guide
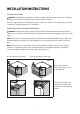
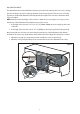


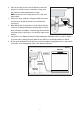
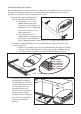


Table Of Contents

INSTALLING THE ADJUSTABLE TOE KICK
Once the dishwasher is put into the enclosure, the toe kick needs to be installed. The two piece toe kick can
be adjusted to the height and depth required for the placement of the dishwasher. Make sure the unit is
plumb and level in the enclosure before installing the the toe kick.
1. Determine the height of the dishwasher to
figure the adjustable plinth installation.
a. If the height is 33 7/8" - 35 7/8"
(860mm-910mm) and the short
leveling legs are used, attach the Toe
Kick Brackets to the 3.15" (80mm) high
Metal Toe Kick using 5/32" x 7/32"
(4mm x 6mm) screws.
b. If the height is above 35-7/8"
(910mm) and the long leveling legs are
used, attach the Toe Kick Brackets to
the 5.12" (130mm) high Metal Toe Kick using 5/32" x 7/32" (4mm x 6mm) Philips screws.
2. The number of adjustable plinth pieces to use is determined by the height to the bottom of the
counter-top (Figure 12).
a. Stack the correct number of pieces based on the measurement, then insert the round tabs
on the top of the stack through the holes in the bottom, flat edge of the Metal Toe Kick.
b. Secure the toe kick to the plinth pieces using the Plinth Fixing Brackets (Figure 12).
c.
3. Attach the toe kick assembly to
the dishwasher by inserting the
Toe Kick Brackets into the spaces
on either side at the bottom of the
unit. The depth can be set by
determining how far in the
brackets need to be inserted and
sliding the Plinth Locking Pin
through the holes in either arm of
the bracket to stop the bracket
from being inserted farther
(Figure 13).
Figure 10
12
Figure 11
32.28" (820mm)
34.25" (870mm) x1
34.65" (880mm) x2
35.05" (890mm)
x3
35.45" (900mm) x4
35.83" (910mm) x5
or 6
Figure 12