FROST FREE REFRIGERATOR INSTRUCTION MANUAL Model No.: MCBR1010W MCBR1010S To ensure proper use of this appliance and your safety, please read the following instructions completely before operating this appliance.
TABLE OF CONTENTS NAMES OF THE PARTS……………………………………………………… 2 SPECIFICATIONS…………………………………………………………….. 3 IMPORTANT SAFETY INSTRUCTIONS…………………………………… 4 INSTALLATION INSTRUCTION BEFORE USING YOUR REFRIGERATOR……………………..…… 4 INSTALLING YOUR REFRIGERATOR ……………………………… 4 ELECTRICAL CONNECTION………………………………………… 5 OPERATING YOUR REFRIGERATOR TEMPERATURE CONTROL………………………………………….. 6 CHANGING THE LIGHT BULB….…………………………….……… 6 OPERATING FREEZER COMPARTMENT TEMPERATURE CONTROL…………………………………………..
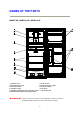
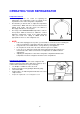
NAMES OF THE PARTS MODEL NO. MCBR1010W / MCBR1010S 1.FREEZER BIN 2.REFRIGERATOR BIN 3.CAN DISPENSER 4.FREEZER SHELF 5.FREEZER TEMPERATURE CONTROL KNOB 6.REFRIGERATOR TEMPERATURE CONTROL KNOB WARNING : 7.LAMP COVER 8.REFRIGERATOR SHELF 9.CRISPER COVER 10.CRISPER 11.LEVELING LEG Never touch the interior of the Freezer Chamber or frozen foods in the compartment with wet hands as this could result in frost bite.
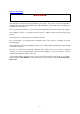
SPECIFICATIONS – Model #MCBR1010W 3
IMPORTANT SAFETY INSTRUCTIONS WARNING To reduce the risk of fire, electrical shock, or injury when using your refrigerator, 4
Electrical Connection WARNING This refrigerator should be properly grounded for your safety. The power cord of this refrigerator is equipped with a three-prong plug which mates with standard three prong wall outlets to minimize the possibility of electrical shock. Do not, under any circumstances, cut or remove the third ground prong from the power cord supplied. This refrigerator requires a standard 115/120 Volt A.C. ~/60Hz electrical outlet with three-prong ground.
OPERATING YOUR REFRIGERATOR Temperature Control • Your refrigerator has one control for regulating the temperature. The temperature control is located on the top left hand corner of the refrigerator compartment. • The first time you turn the unit on, adjust the temperature control knob to “MAX” and run for at least 2 hours before putting foods inside. This will ensure the cabinet is thoroughly chilled before food is put in.
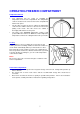
OPERATING FREEZER COMPARTMENT Temperature Control • • • Your refrigerator has one control for regulating the temperature in the freezer compartment. The temperature control is located on the center of the freezer compartment’s interior back panel. The first time you turn the unit on, adjust the temperature control knob to “MAX” and run for at least 2 hours before putting foods inside. This will ensure the cabinet is thoroughly chilled before food is put in.
CARE AND MAINTENANCE Cleaning Your Refrigerator • Upon installation of your new appliance, it is recommended that it be cleaned thoroughly. • Turn off the refrigerator first and then unplug the unit from the wall outlet. • Remove all food content. • Wash the inside with a damp warm cloth soaked in lukewarm water and baking soda solution. The solution should569( )0.89126(f)-11.
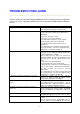
TROUBLESHOOTING GUIDE You can solve many common refrigerator problems easily, saving you the cost of a possible service call. Try the suggestions below to see if you can solve the problem before calling for service. PROBLEM Refrigerator does not operate. POSSIBLE CAUSE Not plugged in. The circuit breaker tripped or a blown fuse. The room temperature is hotter than normal. A large amount of food has been added to the refrigerator. The door is opened too often. The door is not closed completely.
Moisture forms on inside refrigerator walls. Moisture forms on outside of refrigerator. The door will not close properly. can adequately support refrigerator. Level the refrigerator by putting wood or metal shims under part of the refrigerator. The refrigerator is touching the wall. Re-level the refrigerator and move it from the wall. See “Installation Instructions”. Weather is hot and humid, which increases internal rate of frost build-up. This is normal. Door is slightly open.
Refrigerator Warranty MC Appliance Corporation warrants each new Refrigerator to be free from defects in material and workmanship and agrees to remedy any such defect or to furnish a new part(s) (at the company’s option) for any part(s) of the unit that has failed during the warranty period. Parts and labor expenses are covered on this unit for a period of one year after the date of purchase.