Wine and Beverage Center User's Manual Model MCWC50DST / MCBC58DST PLEASE READ THIS MANUAL CAREFULLY BEFORE USING YOUR WINE AND BEVERAGE CENTER AND KEEP IT FOR FUTURE REFERENCE.
ϭ !" % $ " #$" $ KWz *70=: H>D 5>A ?DA270B8=6 0 $0682 745J ?A>3D2C *74 58ABC BC4? C> ?A>C42C H>DA =4F ?A>3D2C 8B C> 2>3D2C A468BCA0C8>= >= >DA F41B8C4 FFF <20??;80=24 2>< A468BC4A *74 14=458CB >5 A468BC4A8=6 H>DA ?A>3D2C 8=2;D34 C74 5>;;>F8=6 (468BC4A8=6 H>DA ?A>3D2C F8;; 0;;>F DB C> 2>=C02C H>D A460A38=6 0 B054CH =>C85820C8>= >A ?A>3D2C D?30C4 (468BC4A8=6 H>DA ?A>3D2C F8;; 0;;>F 5>A <>A4 4558284=C F0AA0=CH B4AE824 ?A>24BB8=6 F74= F0AA0=CH B4AE824 8B A4@D8A43 (468BC4A8=6 H>D
TABLE OF CONTENTS NAMES OF THE PARTS……………………………………………………… 3 SPECIFICATIONS…………………………………………………………….. 4 IMPORTANT SAFETY INSTRUCTIONS……………………………………. 5 INSTALLATION INSTRUCTIONS BEFORE USING YOUR APPLIANCE…………………………..…… 5 FREE STANDING INSTALLATION….………………….…………… 5 BUILT-IN INSTALLATION………..…………………………………… 6 ELECTRICAL CONNECTION ……………….………………………. 6 APPLIANCE FEATURE MCWC50DST: WINE COOLER ……………………………………... 7 MCBC58DST: BEVERAGE COOLER ……………….……………… 7 OPERATING YOUR APPLIANCE MCWC50DST: WINE COOLER …………….
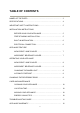
NAMES OF THE PARTS MODEL NO.: MCWC50DST ① Electronic thermostat ② Wine rack ③ Door gasket ④ Glass door ⑤ Cabinet MODEL NO.
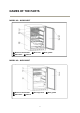
SPECIFICATIONS – Model # MCWC50DST Product Description Magic Chef 50 Bottle Stainless Steel Built-In Wine Cooler Model No. MCWC50DST Unit Dimensions ( inches ) Width Height Depth 23.4” 34.4” 24.4” Net Weight ( lbs) 94.1 lbs SPECIFICATIONS – Model # MCBC58DST Product Description Magic Chef 5.8 cu.ft. Stainless Steel Built-In Beverage Cooler Model No. MCBC58DST Unit Dimensions ( inches ) Width Height Depth 23.4” 34.4” 24.4” Net Weight ( lbs) 94.
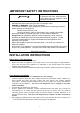
IMPORTANT SAFETY INSTRUCTIONS WARNING To reduce the risk of fire, electrical shock, or injury when using your appliance, follow these basic precautions: Read all instructions before using the wine or beverage cooler. DANGER or WARNING: Risk of child entrapment. To avoid the possibility of child entrapment, please take the following precautions before throwing out the appliance. - Remove all doors from the unit. - Leave the shelves in place so that children may not easily climb inside.
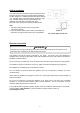
Built-In Installation The cutout dimension illustrated in figure (A) allows for door swing and access to the pull-out shelves when installed as a built-in appliance. If installing between frameless cabinets, a ½” wide filler strip or side panel may be needed on hinge side. The filler strip will act as a spacer between the appliance case and adjacent cabinet door swing. The width of the opening must include the filter panels. Note: The door should protrude at least 1” beyond the surrounding cabinets.
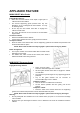
APPLIANCE FEATURE MCWC50DST: Wine Cooler Engaged Wine Shelves There are five wine shelves of full depth in upper part of cabinet to store wine bottles. The second supporting guide (Counted from top, see illustration “A”) is not designed for wine shelves. It is only for beverage shelf. All the top five wine shelve have tabs to engage the cabinet on both sides. Any of the wine shelve can be removed to accommodate larger bottles. To Remove a Shelf: Remove all bottles from the shelves.
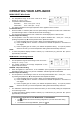
OPERATING YOUR APPLIANCE MCWC50DST: Wine Cooler The temperature range of the wine cooler is for 39°F ~ 64°F (4°C ~ 18°C) +/- 5°F. Temperature Recommendations: Red Wine: 54°F ~ 61°F (12°C ~ 16°C) White Wine: 43°F ~ 50°F (6°C ~ 10°C) The display indicates the average temperature of the appliance at the moment. Pre-Set Wine Zones Press the “RED” or “WHITE” pads to choose preset storage conditions for either red or white wine. (The indicator light “RED” or “WHITE” will illuminate accordingly.
Changing The Inner Light Before removing the inner light, turn off the appliance first and then unplug the unit from the wall outlet. Failure to do so could result in electrical shock or personal injury. Remove two screws that fix the control box. While holding the control box, disconnect the LED connector to the main PCB. Remove the LED array by removing two screws. Replace a new LED array and connect it to the main PCB. Fix the LED array and reinstall the control box.
CARE AND MAINTENANCE Cleaning Your Appliance Upon installation of your new appliance, it is recommended that it be cleaned thoroughly. Turn off the appliance first and then unplug the unit from the wall outlet. Remove all contents. Wash the inside with a damp warm cloth soaked in lukewarm water and baking soda solution. The solution should be about 2 tablespoons of baking soda to a quart of water. Be sure to keep the door gasket (seal) clean to keep the unit running efficiently.
TROUBLESHOOTING GUIDE You can solve many common appliance problems easily, saving you the cost of a possible service call. Try the suggestions below to see if you can solve the problem before calling for service. PROBLEM Appliance does not operate. Temperature inside the appliance is too warm. Temperature inside the appliance is too cold. Vibrations. Moisture forms on inside appliance walls. Moisture forms on outside of appliance. The door will not close properly. POSSIBLE CAUSE Not plugged in.
Ϯ ' "" $) $ ' "" $) $ ??;80=24 >A?>A0C8>= F0AA0=CB 4027 =4F P-8=4 4E4A064 4=C4AQ C> 14 5A44 5A>< 34542CB 8= <0C4A80; 0=3 F>A:<0=B78? 0=3 06A44B C> A4<43H 0=H BD27 34542C >A C> 5DA=8B7 0 =4F ?0AC B 0C C74 2>?C8>= 5>A 0=H ?0AC B >5 C74 D=8C C70C 70B 508;43 3DA8=6 C74 F0AA0=CH ?4A8>3 '0ACB 0=3 ;01>A 4G?4=B4B 0A4 2>E4A43 >= C78B D=8C 5>A 0 ?4A8>3 >5 >=4 H40A 05C4A C74 30C4 >5 ?DA270B4 2>?H >5 C74 30C43 B0;4B A4248?C 8=E>824 8B A4@D8A43 C> A4248E4 F0AA0=CH B4AE824 A4?;024<4=C
CNA International, Inc. d/b/a MC Appliance Corporation. All rights reserved. Magic Chef® is a registered trademark of CNA International, Inc. www.mcappliance.