
Installation Guide

9
ELECTRICAL CONNECTION
Your oven is supplied for connection to a 115V, single phase grounded circuit. The electric motor, oven lights,
indicator lights and control circuits are connected through an electric supply cord found at the rear of the oven.
Warning: This appliance is equipped with a three-prong (grounding) plug for your protection against shock hazard
and should be plugged directly into a properly grounded three-prong receptacle. DO NOT cut or otherwise
remove the grounding prong from this plug.
Before making any connections to these units, check the rating plate to assure that the voltage and phase of the
oven is compatible with the electrical supply. When installing, all ovens must be electrically grounded in
accordance with local codes, or in the absence of local codes, with the National Electrical Code, ANSI/NFPA 70 (in
Canada - CSA Std. C22.2). Wiring diagrams are located in the control compartment area of the oven. Standard
wiring schematics are also provided with this manual.
GAS CONVERSION
Please check the rating plate for the gas type to be connected for operation. If the available gas is different from
the gas type specified on the rating plate. A gas conversion procedure should be performed by a qualified
technician. It is recommended that a trained gas service technician with the necessary tools, instruments and skills
perform the conversion.
To convert the gas, following steps must be completed:
1. Remove all gas burner orifices and install the provided conversion kits
2. Change the Honeywell control valve. VR8205m2831 is for propane gas. VR8205A2800 is for natural gas use.
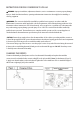
CASTER INSTALLATION
• The casters are connected by a threaded bolt. Be sure to fasten the bolt to the leg hole tightly.
NOTE: The casters with locking brakes are best mounted on the front side of the oven for easier access.
• Align the leg plate holes in each leg with those in the corners of the oven bottom and secure using the
provided bolts. Tighten all bolts firmly. Repeat this procedure for all legs.
NOTE: If you plan to use casters and flexible fuel gas connectors, a fixed restraint of the proper length must be
incorporated to secure the oven to a non-movable surface to eliminate strain on the connector. If the oven is
removed from its normal position, the restraint must then be reattached when returned.
For stacking units, please use a stacking bracket and connect two pieces with screw and install the stacking
chimney assembly.
EXHAUST SYSTEM
The appliance must be positioned in a suitable area for the discharge of the combustion products. These
appliances are not designed to be connected to an evacuation duct for the discharge of combustible products.
These appliances must discharge the combustible products into appropriate hoods or similar devices connected to
a flue of proven efficiency, or they may be connected directly to an outdoor vent.
If it cannot be directly connected to an outside vent, the unit may be connected to an air exhaust system that
leads directly outdoors, providing it has the capacity required plus the air exchange necessary in order to make
operators comfortable.
NOTE: During the initial uses of the appliance, an acrid or burning smell may be detected. This will disappear after
two or three uses.