
Manual


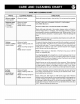


Theporcelainontheburnerisdurablebutovertimeandwith
usemaygraduallyloseitsshine.
Thethreesealedsurfaceburnersaresecuredtothecooktop
andareNOTdesignedtoberemovedbytheconsumer.
SelectmodelsfeatureonespecialPOWERBOOSTsealed
burnerlocatedat thefront.Usethisburnertoquicklybring
watertoaboil.
Cleanburnercapaftereachuseespeciallyif a spillover
occurs.Asoiledburnermayresultinimproperignitionoran
unevenflame.Whencleaningthesealedsurfaceburner,
usecaretopreventdamagetotheignitor.Ifacleaningcloth
shouldcatchtheignitor,itcouldbedamagedorbroken.
If burnerdoesnot light:
1.Thesurfaceburnerwillnotlightiftheignitorisdamaged,
broken,soiledorwet.Theburnerwillalsonotlightifthe
ports,especiallythesmallportlocateddirectlybelowthe
ignitor,areblocked.
2. Checktoseeiftheburnerportsareclogged.Ifso,clean
withastraightpinorsmallmetalpaperclip.
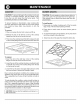
SEALED BURNER HEAD
i orts
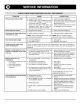
Your RV range or cooktop will feature three surface burners.
Each burner is secured in place with a screw. When burner is
cool, remove the screw before removing the burner. When
re-installing the surface burner be sure to replace the screw.
If the surface burner does not light, check to see if the burner
ports are clogged. If so, clean with a straight pin or small
metal paper clip. Be sure the standing pilot is lit. Check to be
sure that the burner is correctly installed.
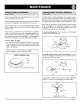
To install surface burner: The air shutter end on the burner
should fit over the orifice hood.
-. Orifice Hood
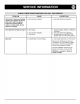
To install surface burner with Piezo ignition: The two
tabs on each flashtube should be securely inserted into the
two slots on each burner head.
kl_ _ Two
Tabs
The flashtube "hold down" clips should secure the flashtube
in place. The clips are located under the metal shield.
Flash
LJ
down"
3 BURNER COOKTOP