
User guide


Installation
MultiView™ II AK600DP/AK1200DP Installation and User Guide 15
4.5.6 Clamp-mode Settings (CFG2: LED1-2)
The receiver allows you to select the video clamp-mode.
Perform the following procedure while the receiver is in the normal operating state (CFG indicator is off):
1. Press and hold the CFG button until the CFG indictor is ON. Release the CFG button.
a. LEDs 1-8 will show the current value for all Mode-1 configuration settings as bright/off.
2. Press and release the SKEW/SEL button exactly five times.
a. The CFG indicator will start flashing.
b. LEDs 1-8 will show the current value for all Mode-2 configuration settings as bright/off.
3. Press and release the SKEW/SEL button once.
4. LED indicators 1 and 2 should be illuminated (either DIM or ON); all others (indicators 3-8) should be
off.
5. Use the UP and DOWN button repeatedly to step through the available video-option settings as shown
below.
6. To leave configuration-mode-2, leave the buttons untouched for 10 seconds or press the CFG button.
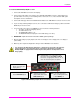
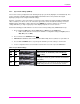
Table 5: Clamp-mode Settings
LED1
LED2
Front Panel View
Clamp-mode Settings
dim
dim
Auto-detect the required clamp-mode based on the video
signal format.
This is the factory-default mode.
dim
ON
Force clamp-mode Off.
If needed, this is the preferred setting for component/composite
video.
ON
dim
Force clamp-mode On.
If needed, this is the preferred setting for RGBHV (VGA) video.
Note: The default auto-detect clamp-mode setting will usually work for any RGBHV(VGA), component or
composite video signal being received from a MultiView transmitter. However, in some cases it may be
necessary to manually select either the OFF or ON setting: OFF is preferred for component & composite
signals; ON is preferred for RGBHV(VGA) signals.