
User guide


Installation
MultiView™ II AK600DP/AK1200DP Installation and User Guide 8
To install the MVII-AK600(1200)DP receiver:
1. Connect the VGA OUT connector to the display.
2. Connect any audio and/or serial cables to the (AUX I/O) and (IOIO) connectors, depending on the
specific model of receiver you are installing. Please refer to the –A, -S, -232, -SA and –SAP option
descriptions for more information.
3. Connect the Category cable from a MultiView transmitter to the LINK INPUT connector on the receiver.
4. If you are daisy-chaining multiple receivers, also connect the downstream Category cable to the LINK
OUTPUT port on the receiver.
5. Connect the DC power cable to the POWER port, and check for the following indicators:
The power-on LED should light up (Green).
The CFG indicator is off.
The SKEW/RGB indicator is off.
The EQ/SKEW indicators display the current EQ settings (0 to 100%).
6. IMPORTANT: Adjust the receiver’s EQ and/or SKEW (optional) settings.
7. When the EQ setting is properly adjusted, the video should appear on the display (make sure display is
powered ON).
8. Make any other required configuration changes via the LED/button user-interface.
It is critical that the EQ setting be adjusted to compensate for the length of the Category
cable leading back to the transmitter. Skew compensation adjustment (if your MVII-
AK600(1200)DP is equipped with an AkuComp-II module) will also be important for best
image quality.
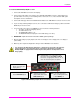
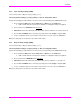
Figure 4: MVII-AK600(1200)DP Receiver Installation Procedure
(Optional) Connect the
output CAT5 cable via the
LINK OUTPUT port.
Connect the video out
HD15 connector to the
display device.
Connect the DC power
cable (+5VDC @ 3A. max)
to the POWER port.
Connect the CAT5 cable
via the LINK INPUT port.
(Optional) Make your serial and/or audio
connections via the DB9 IOIO or AUX I/O
connectors, as appropriate. Refer to –A, -S,
-232, -SA and -SAP option descriptions.